Powered By

Powered by Blogger

Senin, 31 Agustus 2009

ALSA 1.0.21 Was Released!

The ALSA 1.0.21 driver package update brings the Creative X-Fi Linux driver officially along with a horde of updates to the other drivers and more. The CMI8788 Oxygen driver (used by sound cards like the Razer Barracuda AC-1) now includes support for HDAV S/PDIF inputs and when it comes to sound cards now works with the ASUS Xonar Essence ST. Another driver used by many Linux users is the HDA codec driver, which now supports many new notebooks and other sound devices. The HDA Intel driver also supports a new AMD HD audio device. On top of this, the USB audio support for ALSA has received numerous improvements in ALSA 1.0.21.

You can see the full list of changes from 1.0.20 to 1.0.21, HERE.

Beyond the ALSA drivers, the ALSA library, utilities, tools, plug-ins, and PyALSA have all been updated to a version 1.0.21 status.

To upgrade to ALSA 1.0.21, you can use our ALSA 1.0.20 upgrade guide, but make sure you download the 1.0.21 packages instead of 1.0.20.

[credits: phoronix]

OpenOffice.org 3.1.1 Released [Downloads for Windows, Linux - .DEB, .RPM and Mac OSX]

openoffice.org 3.1.1 final

OpenOffice.org 3.1.1 has been released. You can find full release notes, HERE.

You can download Windows files, Linux - .DEB and .RPM and Mac OSX files for OpenOffice 3.1.1 from HERE.

For Ubuntu Jaunty users: if you prefer to install OpenOffice from a PPA instead of the above .deb download, you can add the PPA for OpenOffice.org Scribblers. The OO 3.1.1 packages are not ready, but should be packed soon:

OpenOffice.org 3.1.1 - Only for JAUNTY (being prepared)


Details on how to add the OpenOffice.org Scribblers PPA (for Ubuntu)

Tweak Google Interface, Disable Tracking, Enable Infinite Scrolling and More with GoogleMonkeyR

googlemonkeyr

GoogleMonkeyR is a Greasemonkey script that makes it easy to tweak the Google interface, disable tracking, and enable infinite scrolling.

GoogleMonkeyR allows you to change the way Google search results are displayed. You can turn on numbering, have multiple columns of search results, give search result entries a distinct border or background color, and have the links to the search results open in a new tab. You can also add some extra information to search results by turning on the favicon and image preview function.

One of the handiest tricks in the GoogleMonkeyR bag, however, is enabling auto-loading results and disabling tracking. Instead of clicking from page to page of search results, you can simply scroll on until you run out results to look at. If you don't like Google keeping an eye on your searches when you are logged into Google services, you can disable tracking via GoogleMonkeyR.

Features:

  • Allows you to select 1,2,3 and 4 columns of Google results. You can now use more of your screen space with less scrolling (based on the original concept of Two Column Google by Jeffrey Sharkey)
  • A background or border hue to your search results. Now configurable from the user dialogue with a simple color picker! glooble
  • Remove the Google "Sponsored Links". Like you need Google telling you where to buy stuff!
  • Result numbering. When looking at loads of results you can use this feature to quickly identify where you are and what relevance they may have (especially useful when we come to Auto-loading more results!)
  • Auto-load more results. Seen else where on userscripts.org. This version of the scripts code has been streamlined to allow almost seamless result fetching when you approach the bottom of the screen. Never have to load the next page by hand! (based on the Definitive Google Auto Pager by PaweÅ‚ Kubisz)
  • Remove the web search dialogues from your Google pages. If you use the Google Toolbar for Firefox why waste your valuable screen space when you can hide the extraneous elements away.
  • Make external Google links open in a new window/tab. Now this is configurable in your Google preferences but not with the distinction between when your searching and when your using iGoogle. Well now you can!
  • Disable Google tracking your search results. Every time you click a link in your search results, the click gets reported back to Google for their statisticians to ponder over. If you are signed in to a Google account this click will be recorded in your search history. This function allows you to disable this reporting to Google completely or add an extra "Trackless" link to each of your search results
  • Self updating when a new version of the script is available. Using the same technology seen in my other scripts you'll always be notified of updates. This feature checks userscripts.org every 24hours for later versions of the script. Opening the preferences will force a check there and then (although there is possible caching by FF).
  • Thumbnails for each of your results. Incorporating resources from GooglePreview.com now allows you to see a thumbnail of the home page of each of your search results. If you use this feature think about helping out with the server costs and donate!
  • favicons for each of your results. Show the sites favicon if you so choose... and, of course, they actually have one !)
  • And all of this can be configured through one simple screen. Simply click on the GoogleMonkeyR link at the top right of the page and pick your preferences.
    The original idea/concept for this wonderful preferences screen came from the Rllmuk User Ignore List script written by Jonathan Buchanan (his web site). Reading his code made me stop and look at how i wrote my own code... and then think about going back to school. Hats off!

Minggu, 30 Agustus 2009

Upgrade To The Latest FFmpeg and x264 in Ubuntu Intrepid and Jaunty

A while ago I posted some fixed ffmpeg and x264 packages for Ubuntu Jaunty (.deb) but you may want to upgrade to the latest version of ffmpeg and x264 (whichever the latest version is). So this how-to will explain how to install the latest FFmpeg and x264 and then how to always update those packages. Read on!

Getting the Dependencies
1. Uninstall x264, libx264-dev, and ffmpeg if they are already installed. Open a terminal and run the following:
sudo apt-get purge ffmpeg x264 libx264-dev

2. Next, get all of the packages you will need to install FFmpeg and x264 (you may need to enable the universe and multiverse repositories):
sudo apt-get update && sudo apt-get install build-essential subversion git-core checkinstall yasm texi2html libfaac-dev libfaad-dev libmp3lame-dev libsdl1.2-dev libtheora-dev libx11-dev libxvidcore4-dev zlib1g-dev

Install x264
3. Get the most current source files from the official x264 git repository, compile, and install. You can run "./configure --help" to see what features you can enable/disable. If you are behind a firewall or unable to use git, then daily source tarballs are also available.
cd
git clone git://git.videolan.org/x264.git
cd x264
./configure
make
sudo checkinstall --fstrans=no --install=yes --pkgname=x264 --pkgversion "1:0.svn`date +%Y%m%d`-0.0ubuntu1" --default

Install FFmpeg
4. Get the most current source files from the official FFmpeg svn, compile, and install. Run "./configure --help" to see what features you can enable/disable. If you are behind a firewall or unable to use subversion, then nightly FFmpeg snapshots are also available.
cd
svn checkout svn://svn.ffmpeg.org/ffmpeg/trunk ffmpeg
cd ffmpeg
./configure --enable-gpl --enable-nonfree --enable-pthreads --enable-libfaac --enable-libfaad --enable-libmp3lame --enable-libtheora --enable-libx264 --enable-libxvid --enable-x11grab
make
sudo checkinstall --fstrans=no --install=yes --pkgname=ffmpeg --pkgversion "3:0.svn`date +%Y%m%d`-12ubuntu3" --default
That's it for installation. You can keep the ~/x264 and ~/ffmpeg directories if you later want to update the source files to a new revision. See "Updating Your Installation" below for more details.

Additionally, you can download these .DEB files which I created just moments ago:


But using the above steps, you can always update your packages so that's the recommended way of upgrading FFmpeg and x264!

Using FFmpeg
Audio / video encoding guide
FFmpeg cheat sheet
Or you can automate this using the Audio / Video / Image / Text / ISO Converter Nautilus Script

Updating Your Installation
You may eventually want to update to the newest revisions of FFmpeg and x264 if there are any major developments or changes:
sudo apt-get purge ffmpeg x264
cd ~/x264
make distclean
git pull
./configure
make
sudo checkinstall --fstrans=no --install=yes --pkgname=x264 --pkgversion "1:0.svn`date +%Y%m%d`-0.0ubuntu1" --default
cd ~/ffmpeg
make distclean
svn update
./configure --enable-gpl --enable-nonfree --enable-pthreads --enable-libfaac --enable-libfaad --enable-libmp3lame --enable-libtheora --enable-libx264 --enable-libxvid --enable-x11grab
make
sudo checkinstall --fstrans=no --install=yes --pkgname=ffmpeg --pkgversion "3:0.svn`date +%Y%m%d`-12ubuntu3" --default

Reverting Changes Made by This Tutorial
To remove FFmpeg/x264 and any changes made from this tutorial:
sudo apt-get purge x264 ffmpeg build-essential subversion git-core checkinstall yasm texi2html libfaac-dev libfaad-dev libmp3lame-dev libsdl1.2-dev libtheora-dev libx11-dev libxvidcore4-dev zlib1g-dev

Lastly, delete the ffmpeg and x264 directories in your home folder and if you want, install ffmpeg and x264 from Ubuntu repo.

[Credits: FakeOutdoorsman user @ ubuntuforums.org]

Last Week's Top Posts (Week 35, 2009)

  1. Exaile 0.3.0 Has Finally Been Released
  2. Program Which Automatically Compiles and Install The Latest Kernel in Ubuntu / Debian: KernelCheck
  3. Download OpenShot, A Great New Linux Video Editor, in Ubuntu .deb Package
  4. 4 Linux Books For Beginners
  5. Optimize Firefox SQLite Databases Without Restart
  6. Skype 2.1 Beta For Linux Has Been Released
  7. jQuery FontEffect: Create Font Effects Without Using Images
  8. How To Install Nvidia 185.xx and 190.xx Drivers In Ubuntu, From A Launchpad Repository
  9. Howto: OpenOffice Thumbnails in Nautilus [ Ubuntu / Gnome ]
  10. Rhythmbox 0.12.4 Released - Ubuntu .deb Download

Modify The Colors On Your Gnome Desktop (Including Panel Colors) With Gnome Color Chooser

gnome color chooser

[Linux] Gnome Color Chooser is a GTK+/GNOME desktop appearance customization tool. It can change the colors for almost anything on your desktop, including the panel colors (font, etc). Unlike applications like Murrine Configurator, this utility does not modify your original themes. This way you can keep sharing your themes without any license or naming conflicts.

Features:
* change most important colors (e.g. background, window decoration, tooltips)
* change colors and sizes of GTK+ widgets
* colorize desktop icons
* configure installed GTK+ engines and let your current theme be drawn by an installed GTK+ engine of your choice

Gnome Color Chooser can be found in the Ubuntu universe repo (if you don't know how to enable it, read here), so to install it:
sudo apt-get install gnome-color-chooser


What I like the most about this application is the ability to change the font color in my Gnome panels. I can finally have a dark color panel with white font. Besides colors, you can also modify the brightness or saturation of your desktop icons in normal or hover mode, activate or de-activate hover effects and change the size of all your icons.

And lastly, you can change the engine of some individual part of your theme, for instance: use different engine for the scorllbars, panel, progress bar, etc:

gnome color chooser

Analyze and Benchmark Your Computer: Fresh Diagnose

Fresh Diagnose

Fresh Diagnose is a Windows utility designed to analyze and benchmark your computer system. It can analyze and benchmark many kinds of hardware, such as CPU performance, hard disk performance, video system information, mainboard / motherboard information, and much more...

This tool has a wide range of information regarding all that is part of your computer. Divided by operation class, Fresh Diagnose gives you everything inside your computer to the smallest detail. I must say I was quite impressed and it seems to my like the most complete applications for this job.


Key features of Fresh Diagnose:
  • System Information: Scanning your system and give a complete report about your computer's hardware and software, for examples: mainboard information, video system information, PCI / AGP buses information, peripheral (keyboard, mouse, printer, etc.) information, Windows registry settings, and network information.

  • System Benchmarks: Testing your system performance, such as CPU, hard disk, CD/DVD ROM, and compare it with other systems.


Download Fresh Diagnose (Freeware, but requires registration (free)) | via pplware

Sabtu, 29 Agustus 2009

Gwibber 2.0 Prototype Released

gwibber 2.0Gwibber is an open source microblogging framework and desktop client for GNOME developed with Python and GTK+. The Gwibber backend is a stand-alone daemon that manages updates and retrieves stream data from social networks.

Gwibber currently has support for the following services:

* Twitter
* Identi.ca/Laconi.ca
* FriendFeed
* Facebook
* Jaiku
* Digg
* Flickr
* BrightKite
* Qaiku
* OpenCollaboration (Experimental)

New in version 2.0:

-simple account configuration wizard
-a drop down menu replaces the previous versions tab bar for navigating to replies, etc (in normal mode)
-support for more accounts
-many other additions, improvements and bug fixes

The latest version of Gwibber, 2.0 prototype, is only available in the Gwibber daily PPA. To install it in Ubuntu, open a terminal and run the following commands:
sudo sh -c "echo 'deb http://ppa.launchpad.net/gwibber-daily/ppa/ubuntu jaunty main' >> /etc/apt/sources.list"

You can replace "jaunty" with your Ubuntu version.

Then add the GPG key:
sudo apt-key adv --keyserver keyserver.ubuntu.com --recv-keys 72D340A3

And finally, you can install Gwibber:
sudo apt-get update && sudo apt-get install gwibber

If you have an older version of Gwibber installed, instead of the above command, run:
sudo apt-get update && sudo apt-get dist-upgrade

Overlay Content Using CSS

There are many scripts that use effects to change the content when you put your mouse over something. This is called a rollover effect. In the following examples the "hover" CSS property will be used. We can change colors, background, fonts, text or anything you like. Take a look below.

The HTML code is basically the same for all examples, like this:

HTML:
<div class="infobox">
<img src="URL_imagen">
<div>visible text</div>
<div class="more">text displayed on mouse over</div>
</div>


Example 1:

Demo:


Cum sociis natoque penatibus et magnis dis parturient montes, nascetur ridiculus mus. Maecenas hendrerit quam a elit luctus ut tempor leo congue? Maecenas blandit massa id mi blandit consectetur.


CSS:

.infobox {
border: 1px solid #345;
cursor: pointer;
padding: 5px;
position: relative;
width: 130px;
}
.infobox img {
position: relative;
z-index: 2;
}
.infobox .more {
display: none;
}
.infobox:hover .more {
background-color: #345;
border: 1px solid #89A;
display: block;
font-size: 20px;
height: 130px;
left: 0px;
padding: 5px 20px 5px 140px;
position: absolute;
text-align: justify;
top: 0px;
width: 400px;
z-index: 1;
}


Example 2:

Demo:


Visible Content
Aliquam mattis purus vel leo dignissim vel pulvinar lectus hendrerit! Aenean facilisis ante vel lacus interdum ut lobortis enim aliquet. Vivamus sagittis feugiat est id rhoncus? Maecenas ut leo vel enim mollis tempor. Nullam ornare fermentum tempor. Proin eu interdum massa!


CSS:


.infobox {
-moz-border-radius: 10px;
background-color: #123;
border: 2px solid #567;
color: #ABC;
cursor: pointer;
font-size: 20px;
padding: 5px 10px;
position: relative;
text-align: center;
width: 180px;
}
.infobox .more {
display: none;
}
.infobox:hover .more {
-moz-border-radius-topleft: 10px;
-moz-border-radius-topright: 10px;
background-color: #101921;
border: 2px solid #567;
color: #EEE;
display: block;
font-size: 12px;
left: -2px;
padding: 5px 10px;
position: absolute;
text-align: justify;
top: -2px;
width: 180px;
z-index: 1;
}


Example 3:

Demo:


EXPAND
Sed interdum interdum accumsan. Pellentesque habitant morbi tristique senectus et netus et malesuada fames ac turpis egestas. Vestibulum ante ipsum primis in faucibus orci luctus et ultrices posuere cubilia Curae; Vivamus fringilla aliquam lectus; laoreet accumsan magna vulputate eget. Aliquam vel quam mi.


CSS:


.infobox2 {
color: #888;
cursor: pointer;
font-size: 16px;
font-weight: bold;
position: relative;
text-align: center;
width: 130px;
}
.infobox2 img {
position: relative;
z-index: 2;
}
.infobox2 .more {
display: none;
}
.infobox2:hover .more {
-moz-border-radius: 10px;
background-color: #333;
color: #BBB;
display: block;
font-size: 14px;
font-weight: normal;
height: 130px;
left: 0px;
padding: 15px 20px 10px 135px;
position: absolute;
text-align: justify;
top:- 5px;
width: 320px;
z-index: 1;
}


Credits: vagabundia

2 New Themes for Ubuntu

Silent Night

th 111113 1 2 Temas para tu Ubuntu th 111113 2 2 Temas para tu Ubuntu th 111113 3 2 Temas para tu Ubuntu

Download


PLKSTKGLSSGRY

th 111117 1 2 Temas para tu Ubuntu

Download

[via ubuntu tips]

More Ubuntu Themes posts from Web Upd8.

Jumat, 28 Agustus 2009

Turn Your Computer Into A Planetarium with Open Source App Stellarium [Windows, Linux, Mac OSX]

stellarium screenshot

Stellarium is an open-source application (works on Linux, Windows and Mac OSX) with a database of more than 210 billion stars, planets and major satellites which it can display in real-time, right on your computer.

At its most basic, Stellarium will display the night sky as seen from anywhere on earth. Delving into the more advanced features you can do all sorts of really interesting things like see the constellations for a dozen different cultures—the Pegasus from Greek mythology is the Turtle in the Navajo tradition.

You can watch the rotation of the stars in real time, control atmospheric conditions, zoom as though using a powerful telescope, and superimpose a wealth of information onto the night sky like the names of stars, orbits of planets, and illustrations of the constellations.

If you're using Stellarium on your laptop to supplement your stargazing, you can turn on a night mode that dims the brightness and displays the menus in a night-vision-preserving red.

You may want to check out the more screenshots section on Stellarium website.

Download Stellarium (Windows .exe, Mac OSX .dmg and Linux source files) | Download Stellarium for Ubuntu and Debian (.deb)

Stellarium Plugins

For Stellarium 0.10.2/Ubuntu i386

  • Bungle containing AngleMeasure, CompassMarks, Ocular, TextUserInterface and Satellite plugins. Un-tar this in your ~/.stellarium directory: stellarium-plugin-bundle.tar.bz2

For Stellarium 0.10.2/Win32


[via lifehacker & genbeta]

Adding Your Own FeedFlare And Other Feedburner Tips

Custom Feedburner feedflares


feedburner feedflare

Feedburner, the leading provider of media distribution and audience engagement services for blogs and RSS feeds which is now owned by Google, allows you to spice up your feed with feedflares. A fleedflare is something like "Submit to Digg", "Save to delicious" and so on. While it provides some already made feedflares, you may want to add some of your own, like "Follow me on Twitter", or "Visit our Facebook Fan Page" and basically anything you can think of.

To add your own feedflare for Feedburner, you need to create a .xml file (just use Wordpad or something similar and create any type of file, then change it's extension) which has the structure of something like this (below example is for "Follow us on Twitter"):

<FeedFlareUnit>
<Catalog>
<Title>Follow us on Twitter</Title>
<Description>A custom Twitter feedflare
</Description>
</Catalog>
<FeedFlare>
<Text>Follow us on Twitter</Text>
<Link href="http://twitter.com/webupd8"/>
</FeedFlare>
</FeedFlareUnit>


custom feedflare

If you want to use this, just change the link to Web Upd8's Twitter page with your own. Then, upload this file to any host, go to your FeedBurner account, and on the "Optimize" tab, enable "FeedFlare" and then, under "Personal feedflare", enter the link to your custom Feedburner feedflare and click on the "Add New Flare" button. In the exact same way you can create a feedflare for your Facebook fan page or anything alike.

Now if say, you would like to create a feedflare to display a permanent link to each post, the .xml file would have to look like this:

<FeedFlareUnit>
<Catalog>
<Title>Permalink2</Title>
<Description>Adds the permalink of posts to help verify as the original source</Description>
</Catalog>
<FeedFlare>
<Text>${title}</Text>
<Link href="${link}" />
</FeedFlare>
</FeedFlareUnit>


I've added 3 such custom feedflares to Web Upd8's feed, so you can see them live by subscribing to Web Upd8.

For more advanced FeedFlares, visit THIS page.

Changing FeedBurner 302 redirect to 301


By having FeedBurner click tracking turned on and set on "complete item use statistics" (which is default), not only are you losing out on link juice from legit sites that use your feed for link references, you are also losing out on links from all the sites scraping your content. That is because having this settings, Feedburner uses a 302 redirect (Moved Temporarily). Changing this to "search engine rankings" changes the redirect to 301 which means permanent redirect. This way you will get link juice for your links.

feedburner 302 redirect

To set this the right way, login to your Feedburner account, and on the "Analyze" tab, click on "Configure stats" (the last link on the left). Then, on "Item link clicks - optimize for", select "search engine rankings". That's it. If your going to get scraped, you might as well get some link juice out of it.

Blogger (blogspot.com) tip: if you are using Blogger, go to your dasboard > Settings > Site Feed. Under the "Post Feed Redirect URL" enter your Feedburner url. This way, your blog's feed will be redirected through FeedBurner. Also, on the same page, under "Post Feed Footer" you can add some custom text or even code to the footer of your feed.

blogger feed footer

You can even use a tracking image to see how many people read your feed!

Skype 2.1 Beta For Linux Has Been Released

skype logoSkype 2.1 Beta vor Linux has been released yesterday, bringing a lot of new features, including:

  • High Quality Video support.
  • Skype's SILK audio codec.
  • PulseAudio support.
  • SMS sending support.
  • Chat messages editing/removing support.
  • Contact groups support.
  • Typing notification in chat.
  • Chat picture support (add/change/remove) for group conversations.
  • Mood messages are visible in contact list and tooltip.
  • Video/Mobile icons are visible in contact list.
  • Bookmarked Chats are visible in contact list.
  • Contact labels/tags.
There have also been a lot of improvements (such as typing indicator, new emoticons and message editing) and bug fixes. You can see the full list of changes, HERE.

Download Skype 2.1 Beta for Linux (packages available: Ubuntu and Debian .deb, Fedora .rpm, OpenSUSE .rpm and generic installation files).

Issues

If you webcam works but Skype has trouble with using it, create a new empty, let's call it "launch_skype.sh" file and paste this in it:
#!/bin/bash
sleep 2
LD_PRELOAD=/usr/lib/libv4l/v4l2convert.so skype

Then use the terminal to navigate to where this file is located and:
sudo chmod +x launch_skype.sh

And use this file to launch Skype.

Kamis, 27 Agustus 2009

Make Google Chrome Handle Mailto Links Using Gmail

Google Chrome has not yet implemented handling of mailto links, even though it's a Google browser. Then again, it still doesn't have a version of the Google Toolbar.

Fortunately, Chrome does support userscripts so head over at the Chrome Plugins and download ths user script that automatically converts mailto: links to the GMail compose mail URL. Remember, userscripts for Chrome go in your User Data\Default\User Scripts folder.

Further along in the forum, user PAEz contributes a Chrome-friendly .crx [download] extension for ultra-easy installation. Just download the file and click the install button when Chrome asks if you're sure you want to, and you're set. This version also defaults to opening your message in a new tab rather than a separate window.

Remember, depending on your version of Chrome you run and which iteration you decide to use you might need to add a switch to your Chrome shortcut. Right click and choose properties, and append --enable-extensions or --enable-user-scripts after chrome.exe on your shortcut's target.

[via downloadsquad]

Nokia Unveils N900, It's First Linux Phone

nokia N900

The world's largest handset maker, Nokia unveiled on Thursday its first phone running on Linux software, aiming at improving its offering at the top end of the market.

"As Nokia announces the software platform that will drive its future services aspirations it created a dedicated solutions unit -- the challenge will be to ensure that all these elements work in harmony in the face of fierce competition from Apple and Google,"


said Ben Wood, head of research at CCS Insight.

The Finnish firm has dabbled with Linux since 2005, using it in "Internet tablets" -- sleek phone-like devices used to access the Web that have failed to gain mass-market appeal in part due to their lack of a cellular radio.

The new N900 model, with cellular connection, touch screen and slide-out keyboard, will retail for around 500 euros ($712), excluding subsidies and taxes.

Nokia's workhorse Symbian operating system controls half of the smartphone market volume -- more than its rivals Apple, Research in Motion and Google put together.

Nokia said Linux would work well in parallel with Symbian in its high-end product range.

"Open source Symbian is going to be our main platform, and we are expanding and growing it the best we can, both in terms of functionality as well as distribution ... populating more and more of our product line with Symbian,"


[via reuters]

Super Grub Disk Helps Linux Newbies Fix The GRUB (Boot)

super grub disk

Super Grub Disk is a free utility that you can run from a CD, DVD, usb drive, etc. which fixes your Linux GRUB in only three steps. Super Grub Disk allows you to boot Windows or Linux, selectively. Not only that, you can also activate inactive partitions with this software as well as hide partitions to secure them.

Here are some examples in which Super Grub Disk can help:

* GNU/Linux is installed in your pc, you reinstall Windows and GNU/Linux no longer boots as Grub menu no longer appears on boot. You can restore Grub on your MBR automatically.
* You have Windows installed in a second hard disk and it does not want to boot. If you swap it from Super Grub Disk you will be able to boot it.
* You can not boot Windows because your MBR is corrupt or Grub installation is not well done or whatever. With Super Grub Disk you will be able to boot the partition where Windows reside.
* No Active Partition Found message appears. With Super Grub Disk you can activate partitions.

Download Super Grub Disk | via techie-buzz

You should also read:

How To Install Nvidia 185.xx, 190.xx and 195.xx Drivers In Ubuntu, From A Launchpad Repository

Like I told you yesterday, Nvidia recently released two new versions of its Linux graphic drivers: 185.18.36 stable version and 190.25 beta.

Update: now the 190.xx Nvidia graphics drivers are no longer beta!

Update 2: now, the PPA also includes the new 195.xx beta drivers (currently 195.30)

You can install the 185.xx, 190.xx (currently 190.53) and 195.xx (currently 195.30) Nvidia graphic drivers in Ubuntu Jaunty from a Launchpad PPA, following the steps below:

1. Open a terminal and paste the following commands to add the Launchpad repository:

-Ubuntu Karmic Koala
sudo add-apt-repository ppa:nvidia-vdpau/ppa

-Ubuntu Jaunty Jackalope, Intrepid Ibex, Hardy Heron:
sudo sh -c "echo 'deb http://ppa.launchpad.net/nvidia-vdpau/ppa/ubuntu UBUNTU_VERSION main' >> /etc/apt/sources.list"
sudo sh -c "echo 'deb-src http://ppa.launchpad.net/nvidia-vdpau/ppa/ubuntu UBUNTU_VERSION main' >> /etc/apt/sources.list"

In the two lines above, replace UBUNTU_VERSION with your Ubuntu version (in lowercase: jaunty, intrepid or hardy).

2. Import the GPG key (skip this for Karmic Koala if you used the add-apt-repository command):
sudo apt-key adv --keyserver keyserver.ubuntu.com --recv-keys CEC06767


3. Now you can install the Nvidia drivers:

195.xx beta drivers:
sudo apt-get update && sudo apt-get install nvidia-195-modaliases nvidia-glx-195


190.xx:
sudo apt-get update && sudo apt-get install nvidia-190-modaliases nvidia-glx-190


185.xx:
sudo apt-get update && sudo apt-get install nvidia-185-modaliases nvidia-glx-185


If there is an error, you can activate the drivers from System > Administration > Hardware Drivers

via La Zona Linux & Ubuntu Life

Rabu, 26 Agustus 2009

Download 1 Million Public Domain Books in EPUB Format for Free, via Google

pride and prejudice

Google just announced that it will now allow users to download over 1 million public domain books in the EPUB format. Google had already made this archive available to some of its partners, including Sony and Barnes and Noble, but until today users weren't able to download these free EPUB texts from Google directly. Google will continue to make PDF versions of these books available for download as well, but users with eReader's will find the new EPUB files far more useful.

If you don't have an actual hardware eReader but still want to read these EPUB versions, you can also install Stanza or a similar desktop reader to read these books.


To get started, just find any public domain book on Google Books and click on the Download button in the toolbar.

Exaile 0.3.0 Has Finally Been Released [Linux]


(Screenshot of Exaile 0.3.0a3)

Exaile is a music manager and player for GTK+ written in Python. It incorporates automatic fetching of album art, lyrics fetching, artist/album information via Wikipedia, Last.fm scrobbling, support for many portable media players including iPods, internet radio such as shoutcast, and tabbed playlists. It is kind of a Gnome Amarok (If I may call it that...).

Exaile 0.3.0 is a complete rewrite of Exaile from the ground up, and should make development of future versions much easier. A quick overview of what’s new in comparison to 0.2.14:

  • Last.fm cover support
  • Autodetection of cds and media players
  • An optional shiny new context panel, like that of Amarok 1.x
  • Experimental support for gapless (must be enabled in prefs)
  • New artwork throughout exaile
  • A librivox plugin
  • UI has been improved in several places
  • and more!
You can download Exaile source code from here. There is also a PPA for Exaile, but currently only the Ubuntu Karmic packages are available.

Update: Ubuntu Jaunty packages are ready, so to install Exaile 0.3.0, open a terminal and paste the following commands:
sudo sh -c "echo 'deb http://ppa.launchpad.net/exaile-devel/ppa/ubuntu jaunty main' >> /etc/apt/sources.list"
sudo apt-key adv --keyserver keyserver.ubuntu.com --recv-keys 43CBFCC0
sudo apt-get update & sudo apt-get install exaile

If you use Ubuntu Karmic (9.10), just replace Jaunty in the first command above, with Karmic

If you wish to download the latest development code, you can type the following:

bzr checkout lp:exaile

and to update it:

bzr update

Game Booster Improves Games Performance

game booster

Not everyone is able to or interested in upgrading their PCs every other day to allow all the latest games run smoothly on their machine!

Of course, gamers with a budget-rig always look out for alternative methods to run a game properly by tweaking the game settings and configuration, but they forget the other important technical tweaks.

Designed to help optimize your PC for smoother, more responsive game play in the latest PC games with the touch of a button, Game Booster helps achieve the performance edge previously only available to highly technical enthusiasts. It works by defragmenting game directories, temporarily shutting down background processes, cleaning RAM, and intensifying processor performance.

Game Booster is freeware and works on Windows 2000, Vista, XP and Windows 7.

Download Game Booster | via Sizzled Core

4 Linux Books For Beginners

Here are 4 Linux books which are ideal for a beginner:

1. A Newbie’s Initiation To Linux – Download (1.90MB)
2. Introduction to Linux – A hands on guide – Download (1.52MB)
3. Ubuntu Pocket Guide and Reference – Download (2.13MB)
4. GNU/Linux Command−Line Tools Summary – Download (682.45KB)

Thanks to http://insanityville.com for posting these.

Disclaimer: none of the above files is hosted on Web Upd8 or anywhere related to Web Upd8.

Lightweight (4kb) JavaScript Switch Menu

Demo:


The menu uses a cookie to remember it's last state. Click on a category in the menu to expand it and then reload the page. The same category should expand upon page reload. You can choose between "sitewide" and "local" persistence, with the former remembering the menu state across your entire site. This is useful if you have the exact same Switch Menu script on multiple pages on your site (ie: as a navigational bar), and it makes sense for the persistence to last from page to page.

CSS and JavaScript (place this code above the </head> tag in your template:

<style type="text/css">
.menutitle{
cursor:pointer;
margin-bottom: 5px;
background-color:#ECECFF;
color:#000000;
width:140px;
padding:2px;
text-align:center;
font-weight:bold;
/*/*/border:1px solid #000000;/* */
}

.submenu{
margin-bottom: 0.5em;
}
</style>

<script type="text/javascript">

/***********************************************
* Switch Menu script- by Martial B of http://getElementById.com/
* Modified by Dynamic Drive for format & NS4/IE4 compatibility
* Visit http://www.dynamicdrive.com/ for full source code
***********************************************/

var persistmenu="yes" //"yes" or "no". Make sure each SPAN content contains an incrementing ID starting at 1 (id="sub1", id="sub2", etc)
var persisttype="sitewide" //enter "sitewide" for menu to persist across site, "local" for this page only

if (document.getElementById){ //DynamicDrive.com change
document.write('<style type="text/css">\n')
document.write('.submenu{display: none;}\n')
document.write('</style>\n')
}

function SwitchMenu(obj){
if(document.getElementById){
var el = document.getElementById(obj);
var ar = document.getElementById("masterdiv").getElementsByTagName("span"); //DynamicDrive.com change
if(el.style.display != "block"){ //DynamicDrive.com change
for (var i=0; i<ar.length; i++){
if (ar[i].className=="submenu") //DynamicDrive.com change
ar[i].style.display = "none";
}
el.style.display = "block";
}else{
el.style.display = "none";
}
}
}

function get_cookie(Name) {
var search = Name + "="
var returnvalue = "";
if (document.cookie.length > 0) {
offset = document.cookie.indexOf(search)
if (offset != -1) {
offset += search.length
end = document.cookie.indexOf(";", offset);
if (end == -1) end = document.cookie.length;
returnvalue=unescape(document.cookie.substring(offset, end))
}
}
return returnvalue;
}

function onloadfunction(){
if (persistmenu=="yes"){
var cookiename=(persisttype=="sitewide")? "switchmenu" : window.location.pathname
var cookievalue=get_cookie(cookiename)
if (cookievalue!="")
document.getElementById(cookievalue).style.display="block"
}
}

function savemenustate(){
var inc=1, blockid=""
while (document.getElementById("sub"+inc)){
if (document.getElementById("sub"+inc).style.display=="block"){
blockid="sub"+inc
break
}
inc++
}
var cookiename=(persisttype=="sitewide")? "switchmenu" : window.location.pathname
var cookievalue=(persisttype=="sitewide")? blockid+";path=/" : blockid
document.cookie=cookiename+"="+cookievalue
}

if (window.addEventListener)
window.addEventListener("load", onloadfunction, false)
else if (window.attachEvent)
window.attachEvent("onload", onloadfunction)
else if (document.getElementById)
window.onload=onloadfunction

if (persistmenu=="yes" && document.getElementById)
window.onunload=savemenustate

</script>


HTML (Add the below where you want the menu to appear on your page):

<!-- Keep all menus within masterdiv-->
<div id="masterdiv">

<div class="menutitle" onclick="SwitchMenu('sub1')">Site Menu</div>
<span class="submenu" id="sub1">
- <a href="new.htm">What's New</a><br>
- <a href="hot.htm">What's hot</a><br>
- <a href="revised.htm">Revised Scripts</a><br>
- <a href="morezone/">More Zone</a>
</span>

<div class="menutitle" onclick="SwitchMenu('sub2')">FAQ/Help</div>
<span class="submenu" id="sub2">
- <a href="notice.htm">Usage Terms</a><br>
- <a href="faqs.htm">DHTML FAQs</a><br>
- <a href="help.htm">Scripts FAQs</a>
</span>

<div class="menutitle" onclick="SwitchMenu('sub3')">Help Forum</div>
<span class="submenu" id="sub3">
- <a href="codingforum.htm">Coding Forums</a><br>
</span>

<div class="menutitle" onclick="SwitchMenu('sub4')">Cool Links</div>
<span class="submenu" id="sub4">
- <a href="javascriptkit.htm">JavaScript Kit</a><br>
- <a href="freewarejava.htm">Freewarejava</a><br>
- <a href="cooltext.htm">Cool Text</a><br>
- <a href="http://www.google.com">Google.com</a>
</span>

<img src="http://www.netupd8.com/w8img/17ac8n.jpg" onclick="SwitchMenu('sub5')"><br>
<span class="submenu" id="sub5">
- <a href="link.htm">Link to DD</a><br>
- <a href="recommendit.htm">Recommend Us</a><br>
- <a href="contact.html">Email Us</a><br>
</span>

</div>

via: makeuseof / credits: dynamicdrive

Nvidia Updates The Linux Display Drivers

Nvidia updated both the stable and beta drivers for Linux.

185.18.36 (stable) release highlights:

* Fixed a bug that caused kernel panics when starting X on some mobile GPUs.
* Fixed an interaction problem between VDPAU and PowerMizer when using VDPAU solely as a display mechanism, and not to decode video streams. The GPU performance level should now be raised, if required, in this scenario.
* Fixed VDPAU to avoid "display preemption" in some cases where a VdpOutputSurface is deleted while it is still active (either queued or visible) in a VdpPresentationQueue. In particular, this can occur in MPlayer when using the "-fs" option, and could completely prevent VDPAU from operating successfully, depending on the exact timing conditions.

The 185.18.36 NVIDIA Accelerated Linux Graphics Driver Set for Linux/x86 is available for download via HTTP.
The 185.18.36 NVIDIA Accelerated Linux Graphics Driver Set for Linux/x86-64 is available for download via HTTP.

190.25 (beta) is currently under development and most notably it brings support for OpenGL 3.2. The NVIDIA 190.25 driver update just brings fixes and no additional features, but it now supports rejecting video modes based upon DisplayPort bandwidth to fix some corruption issues, an initialization fix for some NVIDIA mobile GPUs, a workaround for an X Server bug, and a nvidia-settings crash fix when displaying GPU information with Xinerama.

The 190.25 NVIDIA Accelerated Linux Graphics Driver Set for Linux/x86 is available for download via FTP.
The 190.25 NVIDIA Accelerated Linux Graphics Driver Set for Linux/x86_64 is available for download via FTP.

[via phoronix]

Selasa, 25 Agustus 2009

Blogger (Blogspot.com) Introduces The Label (Tag) Cloud Gadget

One of the most requested gadgets for Blogger was the Label Cloud (or tag cloud). Previously, the label gadget showed a list of labels:

blogger tag cloud

Users can also select which labels to be displayed:


To add this tag cloud to your blog, log-in and in your Blogger Dashboard: Layout > Page Elements, click on "Add a Gadget" where you want the tag cloud to be displayed, then select "Labels" from the Basic gadget list. P.s.: don't forget to check the "Cloud" box in the labels options!

Disqus Comment System Gets Updated to V3

disqus v3

Disqus V3 is being rolled out today and promises to be the biggest change to the product since its inception in 2007.

With the ability to sign on with existing social networking accounts like Facebook or Twitter, Disqus offers lots of advantages to both users and publishers. Users benefit because they get a platform that lets them keep the same identity across multiple sites and easily comment without having to create yet-another account. Publishers benefit because they don’t have to worry about running comment registrations themselves, plus they get to easily integrate other social networks directly into their blogs.


The new Disqus Comments improved automated tools for dealing with spam or abusive comments. There is a restricted word filter that will trigger moderator approval on comments and you can whitelist or blacklist a certain e-mail or username.

A new addition I really like is the new Narcissus theme (no need for a screenshot, we already switched to this theme, here, on Web Upd8, take a look below).

Disqus Comments can import IntenseDebate and JS-Kit comments and export comments back out too. Additionally, the Moveable Type and WordPress (WordPress) plugins have been updated and allow for full comment synching.

Registered users will have their comments number displayed next to their username - another addition I really like:

disqus v3 comment number

Now if I could only see the total number of comments for my blog...

Again, Disqus Profile isn’t another profile, but a management tool for commenters to better keep track of and control their comments, subscriptions and various profiles. You can search through the comments you have left on other sites and edit or delete them without having to go back to a specific site or blog entry. You can also easily add-in your various social profiles from Facebook, Tumblr, Twitter and OpenID and choose to syndicate your comments to some or all of those services.

You can also merge your profiles together. This is great for those of us who often forget that we sign-up or login with something and then end up with multiple accounts for the same thing.

The best addition in my view is that now, after you post a comment, the page won't need to reload. This can easily be set for any blog. For Blogger Blogs it may seem tricky because it requests you enter a url to a blank.html page or to /does-not-exist/ hosted on your domain. But this can easily be done by entering http://YOURBLOG.blogspot.com/blank.html (or any other URL which redirects to a 404 page) in the corresponding form field (Disqus Dashboard > Settings > General at the bottom of the page). You can test this feature by commenting to this post ;)

And the last new addition I noticed: Disqus now supports FeedFlare for FeedBurner, meaning it can display the number of comments from your blog, right on your feed. To enable this, login to your Feedburner account, go to Optimize > FeedFlare, enable it and in the "Add new flare" field, enter http://YOUR_BLOG_DISQUS_NAME.disqus.com/~feedflare/comments_link.xml , obviously replacing YOUR_BLOG_DISQUS_NAME with your blog name on Disqus (Example: http://webupd8.disqus.com/~feedflare/comments_link.xml)

Please note there could be other changes / improvements too, but Disqus hasn't publish any info just yet.

[via mashable.com]

LazyFeed, The Realtime Interest Feed Reader Is Now Live

lazyfeed

Lazyfeed, the realtime interest feed reader that launched last month in private beta, is opening up publicly today for anyone who wants to sign up.

What exactly is Lazyfeed?

Instead of signing up for a long list of blogs and news feeds, all you have to do on Lazyfeed is type in a topic and Lazyfeed will show you the most recent posts and articles with that tag from the one million blogs that it now indexes. (This number is up from 100,000 blogs at launch). Headlines and excerpts containing that tag appear in the main window, and if you want to follow that topic, you can save the tag in a column on the left. As you save more tags, your interests appear as a list, which reorder themselves according to the latest posts.


So instead of a list of blogs, you have a list of interests, and Lazyfeed goes out and discovers content for you around those interests. For any given tag you put unto the search bar at the top, it also supplies you with related tags just underneath that you can click on to explore further. If you don’t like a particular blog, you can remove it from your results. Another new feature since the private beta launch is that you can now share any post on Twitter, Facebook, or email.

I have been using it for about an hour and I must say I really like it, but I definitely won't give up Google Reader for it. Instead, I might use them both.

[via techcrunch]

Rhythmbox 0.12.4 Released - Ubuntu .deb Download

rhythmbox 0.12.4

Rhythmbox, the default audio player in Ubuntu was updated recently to version 0.12.4. Among the changes:

Interesting changes:
* New HAL-free media player detection code (using GUdev and the media-player-id collection of device info files); improved MTP device detection allowing multiple devices and devices not explicitly supported by libmtp (Jonathan Matthew)
* Audio CD improvements: allow metadata retrieval to be retried, link to the musicbrainz submission page when data is missing (Bastien Nocera, Matt N)
* Configurable action for mouse-wheel events on the status icon (volume control or next/previous track) (Gustavo Mora)
* Rearranged to link properly (should help building on Windows or with -Wl,-as-needed, probably) (Jonathan Matthew)
* Variety of crashes fixed (Jonathan Matthew)
* Occasional transfer problems with MTP devices fixed (Jonathan Matthew)

Bugs fixed:
322265 - Can't reload CD metadata
376863 - option to configure default action of mouse roll event on tray icon
437110 - librhythmbox-core.so missing some library links
535065 - If a cd is not listed in musicbrainz it can not be added
561953 - Scan Removable Devices don't works with MTP music players
563544 - rework MTP device detection for libmtp 0.3.0
580440 - lists with only one song don't repeat with both "repeat" and "shuffle" selected
585595 - crash at end of playlist with crossfading disabled
586598 - use streaming song titles for lyrics searches
587662 - improved warning message in python plugin support code
588248 - link last.fm plugin with libsoup-gnome
588257 - occasional crash on shutdown
590108 - crashes if there are no saveable metadata types
591874 - pack right sidebar with shrinking disabled
592325 - crashes initialising an iPod Touch

You can download Rhythmbox 0.12.4 from HERE or add the GetDeb repository (although it will some time till it gets updated here).

Preview And Install / Uninstall Fonts In Windows With Portable Application NexusFont

NexusFont is a font manager for Windows. If you have many fonts and you need to choose the fonts you want, this program is for you. You can compare many fonts at once. and there are useful functions to manage font files like install / uninstall, etc.

NexusFont

NexusFont is freeware, portable and works on Windows 2000/XP/2003/Vista. You can download it from HERE.

Opera 10 RC1 Released, Final Version To Be Launched September, 1

Opera Software has just released Opera 10 RC1 to the masses and has announced it will be debuting the final version of its upgraded desktop browser next week on September 1. You can download the release candidate and get more information right here.

Opera 10, formerly codenamed Peregrine, will feature an improved user interface, increased web standards support, bug fixes, performance improvements, and new tools for web developers. Opera 10 Final will also include Opera Turbo, the new bandwidth-booster for slow Internet connections, and a revamped Opera Mail, its built-in e-mail client. Also worth testing when it comes out: Opera claims the next version of its desktop browser will be significantly faster on resource intensive pages such as Gmail and Facebook, deeming it more than 40% faster overall than Opera 9.6.

Where To Host Your Blogger Blog JavaScript Files?

We all know that having your blog hosted at Blogger (blogspot.com) isn't that easy. One of the issues which Blogger users have to deal with is hosting their JavaScript files. Once, everything was easy, by using Google Pages. Some time ago I was telling you how to 'tweak' FileDen to host your JavaScript files as .txt but 5 GB bandwidth per month is not enough so I searched for something with unlimited bandwidth and found quite a few alternatives:

1. The most obvious choicee is Dropbox which can be used to host any kind of files for your blog. Dropbox is a sync and backup tool but it's server lets you host 2 GB of files to their server, and also, inviting friends to join can get you 3 more GB of space (5 GB total) - all for free. Dropbox can be used for other things too, like i told you HERE and HERE.

2. Office Live Small Business offers, among others, a solution for building a website. You can use this to host your files (free). It offers 500 MB of space, but that should be enough to host some JavaScript files, isn't it? :)

3. Lycos Tripod, the Spanish version of the website still offers unlimited traffic and 1 GB of space, for free (unlike it's .com version which only offers 20 MB space and 1 GB monthly bandwidth for free). The only downside is the web interface which is in Spanish. But you can use Google Translator for that.

Do you know any other hosting solution with unlimited monthly bandwidth, for free? If so, please share it using the comment form below! Thanks!

Senin, 24 Agustus 2009

VLC Allows You To Convert Videos [Quick Tip]

I can't believe I missed this. VLC allows you to easily convert videos. Simply go to Media > Convert / Save, select the video(s) you want to convert, then press the "Convert / Save" button and you'll be able to choose from different codecs, etc:

vlc convert video

Thanks to Ubuntu Life & JSBlog for the info!

Yahoo Messenger 10 Beta Released

Yahoo Messenger 10 alpha has been spotted in the wild for a few months and now, Yahoo! finally decided to release the Beta version for public use.

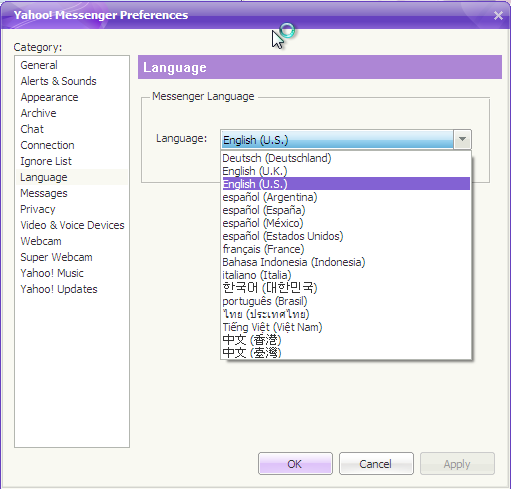
With this new release of Yahoo! Messenger, the biggest news is the debut of truly high quality video calling. Using your Web cam, you can now have full-screen, face-to-face video conversations with crystal clear audio for free from right within your Yahoo! Messenger window. Messenger is also more getting social as we roll out new features to help you stay in closer contact with friends and family. A new “Updates” tab gives you a quick glimpse of what your contacts are up to – including status updates, Flickr uploads, Yahoo! Buzz stories, Tweets and more. Another interesting Yahoo! Messenger 10 feature is that you are now able to change the language to something other than english:

yahoo messenger 10 non-english


Here is a video with what's new in Yahoo Messenger 10 Beta:


Download Yahoo Messenger 10 Beta | You may also want to patch Yahoo Messenger 10 Beta for using multiple instances (multi-messenger).

In other news, Yahoo also increases in Yahoo Mail's attachment size limits from 10 to 25MB. And finally, certain Yahoo searchers will get results that all for both filtering by topic/subject, and contextual follow-ups when you search one term after another. As Yahoo explains it, if you search for "cat" and then "jaguar," its engine should know that, based on the "cat" search, your "jaguar" is much more likely a creature than a luxury vehicle.

Restarter Windows Program Automatically Restarts Crashed Apps

Restarter process monitor windows

Restarter is a free Windows-only application that automatically monitors and restarts crashed or hung programs and applications. It can monitor and restart any console or form based program or application. If your application crashes or if someone accidentally shuts it down, the Restarter will automatically restart the software with all the parameters that you have specified.

It's a great utility that you can use to ensure that your critical programs are always up and running.

Please note: If you are running this application in Windows 7 or Vista, you need to run it in administrator mode.

[via nirmaltv]

Cross-Platform Data Recovery Solution: TestDisk & PhotoRec

TestDisk & PhotoRec


If for any reason, you have lost information of any of your disks: either hard drives, memory cards or flash drives, you should try TestDisk & PhotoRec, a free, open source multi-platform application distributed under GNU Public License which is very efficient on retrieving data from those drives.

PhotoRec supports data recovery for the following filesystems:

* FAT,
* NTFS,
* EXT2/EXT3 filesystem
* HFS+


You can download PhotoRec and TestDisk from HERE (packages available for: Windows (9x/NT/XP/2000/2003/Vista), Mac OSX, and Linux).

Ubuntu users just have to run the following command in a terminal:
sudo apt-get install testdisk

The, to run it (still in a terminal):
sudo photorec

PhotoRec works with HardDisks, Cdrom, memory card (Compact Flash, Memory Stick, SecureDigital/SD, SmartMedia, Microdrive, MMC...), USB Memory Drives, DD raw image, EnCase E01 image, and also various portable media players including iPod and various digital cameras.

Program Which Automatically Compiles and Install The Latest Kernel in Ubuntu / Debian: KernelCheck

Image and video hosting by TinyPic

KernelCheck is a a program that automatically compiles and installs the latest Kernel for Debian based Linux distributions (Debian, Ubuntu, Mint, etc.). The program also allows for automatic installation of proprietary video drivers via EnvyNG.

A kernel is the base of any operating system – in our case, the Linux operating system. KernelCheck will fetch the latest information from http://www.kernel.org, which hosts the source packages for the Linux kernel, and ask the user which one they would like to compile into a .deb package (with the option of installing the kernel after the compilation).


Features

• Fetch latest kernel information (mature kernel, mature kernel patch, stable
development prepatch)
Download and compile any 2.6 kernel into a .deb package
Auto-fix for ALSA sound in new kernels
• Auto-optimize new kernel
• Option to configure kernel options manually
Option to install the nVidia kernel module/driver on reboot
Option to reconfigure the X server
• Custom kernel patching
• Multiple CPU jobs for faster compilation


KernelCheck can be used for several purposes:

1. Fixing hardware issues
2. Speeding up your computer with a shiny new kernel
3. Automatically downloading, compiling, and installing the latest kernel

KernelCheck can install any stable 2.6 kernel, the latest stable patch, the latest stable development prepatch, the latest mm patch, a custom patch, or none at all. Usually the prepatch is less stable than the normal performance patch, but it is still widely used.


After installing KernelCheck (Ubuntu .deb file download link at the end of the post), you will find it under Applications > System Tools > KernelCheck. You can also open KernelCheck using a terminal and typing in:
sudo kernelcheck


Download KernelCheck .deb package for Ubuntu Linux.

Update: KernelCheck stopped working some time ago due to some changes made on kernel.org website, but a patch has been released and you can make KernelCheck work again, running 2 simple commands in a terminal. Read more about patching KernelCheck to make it work again.

jQuery FontEffect: Create Font Effects Without Using Images

jquery fonteffect

FontEffect is a jQuery plugin that adds effects to HTML text, without using any images. In version 1.0 (which has only 7 kb), you can use 4 different text effects: edge (outline), shadow, gradient and reflection (mirror).


To use jQuery FontEffect, use the following code:


- Javascript / jQuery:
<script type="text/javascript" src="http://jqueryjs.googlecode.com/files/jquery-1.3.2.min.js"></script> <script type="text/javascript" src="http://path.to/jquery-FontEffect-1.0.0.min.js"></script>
Place the above code before the </head> tag in your template.

Obviously, replace http://path.to/jquery-FontEffect-1.0.0.min.js with the exact path to the jquery-FontEffect-1.0.0.min.js file. Also, if you already use jQuery, don't include the jQuery code twice.

-CSS:
#example{ font-family: Georgia,'Times New Roman', serif; font-size:3.0em; color:#ff0080; font-weight:bold; margin-bottom:10px;}
This can be placed in your .css file or if you use Blogger, before the ]]> tag in your template.

-HTML:

<div id="example">Web Upd8</div>

<script type="text/javascript">
$("#example").FontEffect({shadow:true});
</script>
The above html code will present the "Web Upd8" text using shadow effect. You can replace it for any of the other effects supported by this jQuery plugin.

It is an interesting jQuery plugin, ideal for dynamically generated headers (such as the title of the post). The best thing is that it works with most known browsers, including everyone's favorite: IE6. :)

More info, live demo & download

Nokia Booklet 3G, The First Nokia Laptop

Nokia_Booklet_3g
Many of you already know that Nokia is the leading manufacturer in the mobile industry for many, many years now. What you probably don't know is that Nokia decided to extend its business in mobile industry to create laptops and the new Nokia Booklet 3G is the first release of its kind.

The mini-laptop is powered by an Intel Atom processor, it has a 10" display and an outstanding battery life (12h). Also, it will run Windows 7 as pre-installed operating system. In terms of connectivity, Nokia Booklet 3G features 3G/ HSPA and Wi-Fi support for Internet connectivity and Bluetooth for data transfer.
The laptop also comes with HDMI port for HD video output pre-installed, a camera for video calling , integrated Bluetooth and SD card reader slot.

Newly enough for a laptop, Nokia integrated in its new product a GPS receiver with A-GPS (Assisted - GPS) which, combined with Nokia Maps can retrieve your location in a few seconds with pinpoint accuracy.

The body is not left behind either and, in my opinion, it doesn't look cheap at all. The case measures about 2 cm thickness and it's made by aluminium. The price has not been revealed yet but some little bird told me that we'll find out some more details on Nokia's World Congress in early September.

Nokia_Booklet_3g