Powered By

Powered by Blogger

Minggu, 31 Oktober 2010

YaRock - A Music Player Designed For Browsing Your Music Collection Based On Album Cover Art

YaRock album view
(YaRock 0.0.28 album view)


YaRock is a new QT4 music player designed to provide a nice overview of your music by allowing you to browse your music collection based on the album cover art. Thanks to its multiple views: album, artist, track, genre or folder view, you can easily find an artist or album even with a large music collection (and if that's not enough, you can always use the built-in search). Depending on the view you're using, you can drag a whole album or just some tracks to the playlist on the right.

YaRock can fetch albums cover art from Last.fm or you can load it from a file - but unfortunately you must do this manually for each album. Hopefully an automatic way of doing this will be implemented in the future.

YaRock's main purpose is not to have a huge list of features, but to allow you to browse your music collection in a clear, visual pleasing way so don't expect too many features, at least not for now. The current features include:
  • Music collection database (SQLite 3)
  • Browse your local music collection (by artists, albums, genre)
  • Easy search and filter music collection
  • Manage favorites item (album, artist)
  • Play music from Collection or Playlist
  • Simple Playlist
  • Support MP3, Ogg Vorbis,FLAC music files
  • Download missing album cover art from Last.fm
  • Clean and simple user interface

Yarock artist view
(YaRock artist view)


In my test, YaRock worked quite well, except for a visual glitch for the track, collection and playlist info display (at the bottom of the player - you can notice this in the screenshots) but that's not something major. What I would like is last.fm/libre.fm scrobbling and options to save/load playlists. Once YaRock gets these features, it will become a great lightweight music player.


Unfortunately I don't know how YaRock works on a large music collection because I am in the process of copying my music collection from some old hard disks to my new hard disk, so I only have around 1000 music files on my computer at the time I'm writing this post.

Download YaRock 0.0.28


Ubuntu 10.10 Maverick Meerkat:


Ubuntu 10.04 Lucid Lynx:


Or you can add the LFFL PPA and install it from there: for Ubuntu Lucid or Maverick.


Thanks to LFFL for the .debs and heads up on YaRock!

Sabtu, 30 Oktober 2010

Music And EXIF Metadata Information In Nautilus List View [Nautilus Columns Extension - PPA]

A long time ago, we wrote about a Nautilus extension (called Nautilus Columns) which adds music (mp3, WAV and FLAC) and EXIF metadata info to the Nautilus List View. Well, I though I'd rescue this extension (as it's no longer packaged as a .deb) and upload it to the WebUpd8 PPA so it can be easily installed.


Here's a Nautilus screenshot before using this extension:

Nautilus

And after:

Nautilus Columns


The extension supports displaying the following info in the Nautilus list view columns:
  • mp3, WAV, FLAC: artist, track, album, title, bitrate, date, genre, length and sample rate
  • EXIF: dateshot, image size, software and flash


To install the Nautilus Columns extension (in Ubuntu 10.04 Lucid Lynx and 10.10 Maverick Meerkat), use the following commands:
sudo add-apt-repository ppa:nilarimogard/webupd8
sudo apt-get update
sudo apt-get install nautilus-columns

Once installed, it should automatically restart Nautilus but in case it doesn't, manually restart Nautilus using the following command:
nautilus -q

Then go to Edit > Preferences > List Columns and check the columns you want to see. Then navigate to a folder where you have some music files and switch Nautilus to the List View (View > List, or by using the Nautilus Elementary view widget).


Now there's only one thing missing: being able to play the music directly in Nautilus (no, the music preview built into Nautilus is not what I'm looking for).


I've tested the package on both Ubuntu 10.04 and 10.10 32bit. Since it's written in Python, there shouldn't be any issues on 64bit, however note that I didn't test it on 64bit. Update: Zagrux posted a comment below confirming he tested it on 64bit and it works (I was unsure about the dependencies).


Credits for this script: jmdsdf, geb666, Giacomo Bordiga / Ubuntuforums thread.

Java (JDK) Updater - Script To Update The Java (JDK) Paths After Manual Installation

Ubuntu is kind of slow at updating JDK in the official repositories. And not only that but if you've used Ubuntu 10.10 Maverick Meerkat before the final release, you probably know that Java has only been uploaded to the Ubuntu Partner repository a few days before the final release so you could either use the Ubuntu 10.04 repository or manually install Java.

When you manually install JDK, you have to update the paths to get it to work. For this, you can use a script created by WebUpd8 reader Bruce Ingalls (this is actually a new version as we've already wrote a while back about this script) which uses Zenity and can easily update the Java (JDK) paths - all you have to do is select the folder where you've installed Java and the script will do the rest.


The script only works for Ubuntu (10.04 and 10.10) and I've packages the script in a .deb file which is available in the WebUpd8 PPA so you can install it using the following commands (for Ubuntu 10.04 and 10.10):
sudo add-apt-repository ppa:nilarimogard/webupd8
sudo apt-get update
sudo apt-get install update-java

Or you can manually download the .deb (works with both Lucid and Maverick)

Once installed, you can launch it via the Applications > Other > Update Java menu item.

If you want to use the script without adding the PPA, you can download it from HERE.

In case something doesn't work, you can create a bug report using the following command:
bash -x /usr/bin/update-java > ~/bugreport.txt 2>&1


How to use install the latest Java (JDK) manually (this is just an example for the latest Java JDK):


Firstly, you'll have to download Java (JDK) from HERE. Then you'll have to move the .bin file to /usr/local/ and run it:

sudo mv jdk-6u22-linux-i586.bin /usr/lib/jvm/
sudo chmod +x jdk-6u22-linux-i586.bin
sudo ./jdk-6u22-linux-i586.bin

Then simply run the Update Java script - either from the menu (if you've installed the .deb) or manually run the script and select the folder where Java JDK has been installed and select the folder where you've installed JDK manually (in my example it should be /usr/local/jdk1.6.0_22).


Thanks to Bruce Ingalls for the script!

Jumat, 29 Oktober 2010

News On The Default Applications In Ubuntu 11.04 Natty Narwhal [Updated]

Today is the last UDS-N day and a session about the default application selection in the upcoming Ubuntu 11.04 Natty Narwhal is ongoing. Here's what has been discussed:

- LibreOffice will likely be included in next version of Ubuntu if it's ready

- Firefox 4 is still favored over Chrome as the default browser in Ubuntu. Chrome still poses too many challenges for Ubuntu (the release cycle doesn't fit well with Ubuntu Update model and also there are issues with the Global Menu integrations and so on).

- The decision to replace Evolution with Thunderbird in Ubuntu has been deferred. Hopefully Thunderbird will be ready in a cycle or two (it misses a calendar, exchange support, integration with appmenu and messaging menu).

- Banshee might be included by default in Ubuntu 11.04 (and thus replace Rhythmbox) if it can be slimmed down to fit on the CD

- Oneconf will be included by default in Ubuntu 11.04. OneConf is a mechanism for recording software information in Ubuntu One, and synchronizing with other computers as needed.

- Gnome-dictionary will be removed from the CD

- Nautilus Elementary was also brought up for discussion, but was rejected "because the patches are considered hacks".


So, what do you think?


quotes via #uds and Gobby notes thanks to @moremormota

Install And Change Plymouth Themes In Ubuntu Using Zorin Splash Screen Manager

Plymouth Splash Screen Manager

If you want a simple Plymouth manager to easily change, install and remove Plymouth themes, try the the new Zorin Splash Screen Manager.

Besides options to install / remove and change the Plymouth theme, Zorin Splash Screen Manager also allows you to change the theme text (for a text mode Plymouth).

There are 2 features I for one would like to see in Zorin Splash Screen Manager: a preview of the already installed themes (thumbnails) and a button to run Plymouth on the desktop so you can see exactly how the whole animation looks without having to restart your computer (that can be done by using these commands: "sudo plymouthd" and then "plymouth --show-splash" and to quit: "sudo plymouth quit"). But considering this is the very first version of Zorin Splash Screen Manager, it has enough time to improve and add the features I mentioned, among others.


Using this application is very simple: once installed, run it from System > Administration > Splash Screen Manager. To install a theme, select the appropiate button in Splash Screen Manager and then browse for the Plymouth theme .tar.gz file (you can find lots of Plymouth themes @ Gnome Look). Once you install some theme(s) you like, click the "Change default theme" button and select the .plymouth file for the theme you want to use (Splash Screen Manager will automatically open your Plymouth themes system folder).


Download Zorin Splash Screen Manager


If you're having issues with Plymouth and proprietary ATI / Nvidia graphics drivers, try this script.


Thanks to WebUpd8 reader Crammed Shelfish for the tip!

Kamis, 28 Oktober 2010

Interesting Unity Concept For Managing Multiple Desktops [Mockups]

Now that Unity will be used by default in Ubuntu 11.04 Natty Narwhal, it's been getting a lot of attention and there are discussions going on about if and how the Global Menu (AppMenu) will behave on the desktop, a better way of managing multiple desktops and many other subjects. One such discussion drew my attention and I though I'd share it with you.


Some mockups designed by David Prieto show off a really interesting concept for managing multiple desktops - take a look:

Unity workspaces mockupUnity multiple workspaces mockup


The purple spaces represent workspaces and what's so interesting about this is the features that could be integrated into such a simple idea:
  • You can move an application between workspaces by simply dragging its icon in the Unity launcher from one workspace (purple area) to another. In the same way, the workspaces can be reorderd too.
  • The empty space above a purple area (workspace) is for switching to that workspace - click the empty space to switch to that workspace.
  • To open an application on a certain workspace, all you have to do is drag its icon from Dash to the workspace you want it to open to.
  • By pinning an application to the launcher in a certain workspace, that application will always open on that workspace.

More info on how this should work, HERE.


These are unofficial mockups, currently being discussed @ Ayatana mailing list and in a thread on the Ubuntuforums. The idea needs further improvements as there are still some unresolved issues, but what these mockups demonstrate (as a general idea) is that Unity has potential to become something truly great, especially since a lot of the performance issues should be solved by using Compiz instead of Mutter.

And that matters even if you don't plan on using Unity for "now" (and by "now", I mean Ubuntu 11.04). Gnome Shell will be out pretty soon and even though the old panel-syle Gnome will still be available, it won't be around forever so at some point you'll have to choose (if you want to stick to Gnome) between Gnome Shell and Unity.


Oh, and there's one more thing: wouldn't it be cool to have the features in David's mockups on say... Avant Window Navigator, Docky, Cairo Dock or DockBarX (because the Gnome panels aren't dead just yet)? Now that would be something!


What do you think?


Image credits: David Prieto

Vineyard Gets A Testing PPA

Vineyard

Vineyard is a collection of tools you can use as a replacement for Wine's default configuration tool, designed to make it easier to manage Wine. Read more about it: Configure Wine With Vineyard [Version 0.1.5 Beta, Released]

Vineyard got a new testing PPA which you can use to stay up to date with the latest 0.1.5 beta builds (which are released quite frequently). To add the PPA (packages available for Ubuntu 9.10, 10.04 and 10.10) and install Vineyard, use the following commands:

sudo add-apt-repository ppa:cybolic/vineyard-testing
sudo apt-get update
sudo apt-get remove python-wine vineyard
sudo apt-get install python-wine vineyard

The removal of Vineyard and python-wine is required if you've installed Vineyard 0.1.5 beta by downloading the .deb files from its website (that's why the above instructions include a "remove" command) - although the Vineyard version in the PPA is newer, the actual version number is lower so you have to remove the old packages to be able to install and stay up to date with the latest Vineyard beta builds from this PPA.

Once installed, you can access Vineyard by going to System > Preferences > Windows Applications.


If you're worried about using a "testing" PPA, remember that Christian Dannie Storgaard, the Vineyard developer, said that the latest Vineyard 0.1.5 beta is more stable than the version available in the "stable" PPA.

Have Questions About Unity? Ask Them At AskUbuntu!

Jorge Castro is answering questions regarding Unity at AskUbuntu, based on the number of votes they receive:

Unity developers will be advising me best on how to answer your questions and we can continue to develop the answers based on feedback.

Several interesting questions have already been answered, like:


Will there be an option to use auto-hide for the Unity dock (launcher)?

According to a bug report comment by Mark Shuttleworth:

status confirmed
importance high

We'll address this in 11.04 with an autohide option.

-Mark


Will Unity be the only option during the Ubuntu 110.4 desktop installation?

Unity will be the default desktop if your hardware supports it. If your hardware does not support Unity, you will get the same desktop that you have today, GNOME 2.x.

If you do NOT want Unity you will have the option to install a GNOME 2.x session directly from the Ubuntu Software Center.


Another interesting question asked is "Will Unity become themeable?", however it seems no decision regarding this has been made so far.


You can see the already asked questions and answers @ http://askubuntu.com/questions/tagged/unity


If you want to ask a question related to Unity in Ubuntu 11.04, head over to AskUbuntu (you'll have to create an account if you don't have one already).

Rabu, 27 Oktober 2010

Sync Chrome Tabs Across Multiple Computers With TabCloud

tabcloud chrome extension

Chrome/ium sync has evolved a lot and the latest dev builds allow you to synchronize almost everything between multiple computers - except tabs.

So what to do? Well, until Chrome will include a feature to sync tabs across multiple computers (such a feature is coming), you can use an extension called TabCloud.

TabCloud allows you to save sessions (it uses your Google account just like the native Chrome sync) and restore them later on another computer. This isn't done automatically so you'll have to manually save / restore a session. Even though I find this a bit inconvenient, others might actually like it, because:
  • you get to choose what sessions to sync so your privacy is covered
  • you can use it even if you don't want to sync your tabs across multiple computers - for instance to save groups of tabs and easily restore them later on.

Another thing I don't exactly like about TabCloud is that it doesn't support pinned tabs so you'll have to manually re-pin the tabs once you restore a session. However (excluding Xmarks), until Chrome will integrate this feature by default, TabCloud is probably the best way to sync tabs across multiple computers.

Using TabCloud

To use TabCloud, click the button in your toolbar, then click the save icon and your session will be stored in the cloud. Then, on the computer where you want to restore the session (it can be both the same computer or another computer on which you've previously installed TabCloud and linked it to your Google account), simply click the "+" sign to restore a session.

Depending on your settings (this can be changed from the TabCloud options), your session will be restored in the same window (but the already open tabs will not be closed) or a new window.


Besides being able to fully restore sessions, TabCloud can also selectively restore only a tab: simply middle click a tab in a TabCloud saved session to only open that tab.


Install TabCloud Chrome/ium extension


New UbuntuForums.org Design On The Way

new ubuntuforums design

The Ubuntu website and basically all the official Ubuntu related websites have been upgraded to use the new Ubuntu branding, except for Ubuntuforums.

But that's about to change. Mike Basinger create a blueprint @ Launchpad regarding this matter which has already been accepted, so it looks like we'll be getting a new Ubuntuforums design soon (I'm not sure when).

Mike also posted a link with a test theme for Ubuntuforums. To check it out for yourself, head over to www.mikesplanet.net/forums. What do you think about the new proposed design (note: the link is marked as "test theme" so it may not be the actual new theme or it may change)?


Update October 31: Some changes have been made to the design so I've updated the screenshot.

Orta GTK Theme: A Stylish Theme Inspired By Bespin And Elementary

Orta

Inspired by the Elementary theme and Bespin, Orta comes with some slick new elements to give your desktop a more polished look. The most interesting elements are the scrollbar - which even though look a like in Elementary, seem more polished -, the Nautilus Elementary breadcrumbs, buttons and the Gedit tabs.

I started this by editing the well known Elementary theme, but i ended up with a pixmap theme anyway. There is still some Murrine though, as the panel remains unchanged, as do the tooltips.

-SkiesOfAzel, Orta creator

Here's a screenshot taken from my computer:

Orta

It's recommended to use Nautilus Elementary and the Faenza Icon theme with Orta!

Please note that the theme is not yet finished: the panel and Metacity are identical to Elementary but these might be updated sometime in the future. Also, there are a few known bugs - read about that at Orta DeviantArt page (link below).


Download Orta GTK theme


Credits for the first image in the post: SkiesOfAzel

You Can Finally Install Evernote (4) In Linux, Under Wine

Evernote 4 wine

Evernote is an application that allows users to collect, sort, tag and annotate notes and other miscellaneous information.

Evernote 4 has been released yesterday and the new version brings a completely redesigned user interface and a re-write of the code to C++. Unfortunately there is still no native Linux version, however the new version runs perfectly under Wine:

v3.5 and v3.6 wouldn't install under Wine as it was using Microsoft .net 3.6 (or something like that), well today I heard evernote v4 was out and the new feature of this is that it is re-written in C++, [...] I installed it under Wine and it ran perfectly

-WebUpd8 reader Richard Arkless


Download Evernote 4


Thanks to Richard Arkless for the tip!

Selasa, 26 Oktober 2010

Use Keyboard Shortcuts To Control Spotify Under Wine (Linux)

Spotifycmd is a command line tool (which even though is called "spotify_cmd.exe", is actually a Linux binary) that can control a running instance of Spotify (in Wine). It can play, pause or stop the current playing track, go to the previous / next track and display the Spotify status (playing artist / song) - but we don't need this last part since we have Spotify-Notify.


Here are the exact Spotifycmd supported commands:
  • Play/pause playback: ./spotify_cmd.exe playpause
  • Stop playback: ./spotify_cmd.exe stop
  • Next track: ./spotify_cmd.exe next
  • Previous track: ./spotify_cmd.exe prev
  • Artist and track information: ./spotify_cmd.exe status


The Spotifycmd also says that it works for volume up/down and mute, but that didn't work for me (Ubuntu 10.10, latest Spotify). Still, that shouldn't be an issue since you can already control the global sound of your desktop using keyboard shortcuts so the only real issue with Spotify is using keyboard shortcuts for next/previous track and play/pause.


Spotify keyboard shortcut

To set up keyboard shortcuts for controlling Spotify, download Spotifycmd and extract it somewhere (like for instance in your home folder), then (in Gnome, I'm not sure about other desktop environments), go to System > Preferences > Keyboard Shortcuts and click "Add", and to set up a "next track" Spotify keyboard shortcut, under name enter whatever you want (like "SpotyNext") and under the "Command" field, enter this:
/path/to/spotify_cmd.exe next

Where /path/to/ is the exact path to the folder where you've extracted Spotifycmd. Then click "Apply and you'll then be able to assign a keyboard shortcut for your custom command.

You'll have to repeat the process for every custom keyboard shortcut you want to asign for Spotifycmd (previous track, playpause and stop).

Ubuntu Font Family Uploaded To The Ubuntu 10.04, 9.10 And 8.04 Official Repositories

I like dogs better

The Ubuntu Font Family, which was only available for Ubuntu 10.10 and 11.04 (in the official repositories) has just been uploaded to the official Ubuntu 10.04 Lucid Lynx, 9.10 Karmic Koala and 8.04 Hardy Heron repositories.

Currently, the font can be found in the "Proposed" repository (but there shouldn't be any issues or regressions as it's just a font) and it should be soon moved to the "Backports" repository.

You could already install and stay up to date with the Ubuntu Font Family in Ubuntu 10.04 and 9.10 by using our Ubuntu Font Family PPA - by the way, you should still be using our PPA since we are usually faster then the Ubuntu official repositories at releasing updates.


Compiz 0.9.2 Released With Minimized Live Window Previews, Natural Scale Mode; 0.9.4 News

Compiz natural scale mode plugin
(New Natural Scale Mode Compiz plugin)

Compiz 0.9.2 has been released with a lot of bugs fixed but also new features such as:
  • a new MultiAnim which allows for mutliple copies of windows in animations
  • minimized live window previews (experimental) - a feature many have been waiting for to use in DockBarX (among others)
  • natural scale mode which pushes windows apart based on their distance from each other already when overlapping
  • re-written group plugin
  • simplified shadow storage in the decorations
  • support for KDE 4.5's blur hint
  • Allow resizing from the center of the window


Here is a video featuring the new minimized windows (using "fake" minimization) live previews in Compiz 0.9.2:


A detailed list of what's new in Compiz 0.9.2 can be found @ Compiz mailing list.


Besides the announcement of Compiz 0.9.2, the post on Sam Spilsbury's blog also specifies the plan for Compiz 0.9.4 which is supposed to support Multi-Touch and Multi-Input, animations framework and massive speedups thanks to the plugins being compiled into core.


And in case you didn't see it, here's another video which demoes some new plugins in Compiz 0.9.x:


Note: the videos are not new but I couldn't find any newer videos.


Thanks to WebUpd8 reader Deon Spengler for the tip! Image, info and screenshot thanks to Sam Spilsbury (smspillaz).

Senin, 25 Oktober 2010

Video: UDS Natty 11.04 - Mark Shuttleworth's Keynote

Part 1:


Part 2:


Or download both videos:
wget http://blip.tv/file/get/Popey-mark1630.flv
wget http://blip.tv/file/get/Popey-mark2472.flv

or, if you have a good internet connection, yet the download is very slow (like it is for me), use aria2:
sudo apt-get install aria2
aria2c --split=10 http://blip.tv/file/get/Popey-mark1630.flv
aria2c --split=10 http://blip.tv/file/get/Popey-mark2472.flv

And play them locally with your favourite video player.


P.s.: if you get a Windows commercial on top of the UDS-n videos, blame it on Blip.tv :)


Thanks to popey for the videos!

Unity To Use Compiz instead of Mutter [Ubuntu 11.04 Natty Narwhal News]

If you though Compiz was left in the dark once Gnome Shell comes out, think again. A post on the blog of one of the Compiz developers states that Unity will use Compiz instead of Mutter as the default window manager:

Most notably this was done for performance reasons, but also because a number of the new interfaces provided in compiz 0.9x allow for some great new stuff to happen with Unity.

And that means a whole lot for the Ubuntu users now when Unity has been announced as being default for Ubuntu 11.04 desktop (and not just for the netbook edition) - they will get to keep the Compiz effects and all the bling (but also usefulness) which attracts so many users to Linux.

This also means that the Compiz development will now be much faster and it will get a lot more attention then before (or at least more then in the last few months).


If you're worried your graphics card doesn't support Compiz, you should know that Compiz 0.9.x no longer requires Opengl or compositing to run. So basically it's not Compiz that will need to support your hardware, but Unity.


Thanks to vs8 for the tip!

Unity Confirmed As The Default Desktop Interface For Ubuntu 11.04, New Icon Theme Should Be Ready By 12.04

unity

The UDS-N (Ubuntu Developer Summit - Natty Narwhal) started today and Mark Shuttleworth already announced that Unity will be default for Ubuntu 11.04 desktop:

"11.04 will have Unity as the default desktop for new users" - via popey

I'm not exactly sure what "new users" refers to, but it might mean that those who will upgrade will use the old Gnome interface instead of Unity. Also (important!), Unity will only be default if your graphics card supports it:

It is going to be a primary focus this cycle to enable Unity on as many chipsets as possible.

(Neil Patel, Technical lead for Ubuntu Netbook Edition and Unity, Desktop Experience Team)


unity shell
A slide from Mark Shuttleworth's keynote at UDS-N


Unity is the current Ubuntu Netbook Edition interface and has received a lot of criticism since UNE 10.10 came out such as not being finished, poor performance and the lack of customization.

Also, a new icon theme will be designed especially for Ubuntu. It will not be ready for 11.04 but the work will probably start now and the new icon theme should be ready by Ubuntu 12.04.


Update: and a surprise (I for one definitely didn't see that coming): Unity will use Compiz instead of Mutter!


If you don't know what Unity is, check out our Ubuntu Desktop and Netbook 10.10 post (lots of screenshots and Unity video inside).

For more info, stay tuned!

Minggu, 24 Oktober 2010

Undo apt-get build-dep (Remove Build Dependencies)

When you want to compile something from source in Ubuntu/Debian, the easiest way to install the dependencies required to compile it is to run (sudo) "apt-get build-dep PACKAGE_NAME". But there is no built-in command to remove these dependencies (like apt-get remove-dep).

But thanks to tvst and Wesley Schwengle, you can undo "apt-get build-dep" by running the following command:
sudo aptitude markauto $(apt-cache showsrc PACKAGE_NAME | grep Build-Depends | perl -p -e 's/(?:[\[(].+?[\])]|Build-Depends:|,|\|)//g')
In the above command, replace "PACKAGE_NAME" with the name of the package you've previously ran "apt-get build-dep" for.

Note for Ubuntu 10.10 users: to use the above command, you need to install aptitude (if you haven't already) because it's not installed by default anymore:
sudo apt-get install aptitude


remove apt-get build-dep


In case you're wondering what the above command does:
  • aptitude markauto - Mark packages as having been automatically installed (so if no package depends on them, they will be removed)
  • apt-cache showsrc - Show source records
  • grep Build-Depends: - searches for "Build-Depends:" in the source records
  • perl -p -e 's/(?:[\[(].+?[\])]|Build-Depends:|,|\|)//g' - removes useless stuff from the package names (like "Build-Depends:", the parentheses and what's in between) so we can use the exact package names in the "aptitude markauto" command.


To use it as an alias in your ~/.bashrc file, see wilo108's comment below.


Credits for the command: tvst and Wesley Schwengle @ Launchpad.

Last Week's Top Posts (Week 42, 2010)

  1. Use Mplayer With Hardware Acceleration In Ubuntu 10.04 And 10.10 [Nvidia]
  2. Install Gnome Shell (From GIT) In Ubuntu 10.10 Maverick Meerkat
  3. Install Elementary GTK Theme 2.0 (With Optional Dark Panel) In Ubuntu
  4. Noflipqlo: Popular Screensaver "Fliqlo" Comes To Linux [Installation Instructions]
  5. Configure Wine With Vineyard [Version 0.1.5 Beta, Released]
  6. Nautilus Elementary PPA Update Brings NE-Terminal-Config, Copy/Paste For The Terminal & Video: Nautilus Elementary With ClutterFlow, Embedded Terminal In Ubuntu 10.10 Maverick Meerkat
  7. Manhattan OS Rebranded As Jupiter OS; Ditches Ubuntu For Debian
  8. Try Something Different: Divergence IV - "A New Hope" (GTK & Emerald Theme) [Post Updated!]
  9. Basenji Gets A Scanner Daemon Which Automatically Adds Inserted Volumes To The Database

Install And Configure Burg In Ubuntu With Burg Manager

Burg Ubuntu
(Burg menu)

Burg (Brand New Universal Bootloader) is a boot loader based on Grub which supports themes so you can choose the OS you want to boot based on its icon in the menu list (it supports a lot of Linux distributions, Windows, Mac OSX).

Burg Manager is an application to easily install Burg (along with the default Burg themes and a Burg emulator) and change most of the Burg settings such as the timeout, download and install new themes, remove Burg and restore Grub 2, set the default operating system and many advanced options. Burg works in both Ubuntu and Kubuntu (I've tested it in both) and most probably other *ubuntu flavors too.

Burg manager
(Burg Manager)

Install Burg Manager

1. To install Burg Manager (even though it hasn't been updated, it works in Ubuntu 10.10 too) in Ubuntu, firstly download and install BUC (it comes with .deb files).

2. Then download and install Burg Manager - you can find Ubuntu 32bit and 64bit download links in THIS post from the Burg Manager author's blog.

Using Burg Manager

Firstly, you must install Burg. To do this, open Burg Manager (Applications > System Tools > Burg Manager) and from its interface, select "Burg install" (from the first tab, called "Burg-installer") to start installing Burg.

When installing Burg for the first time (this doesn't show up if you remove and install Burg again unless you purge everything), you should see a screen like this:

Burg choose hdd

Here, you must press SPACE to select the HDD to install Burg to (an "*" must be displayed next to the HDD where you have installed Ubuntu - like in the above screenshot), then TAB and ENTER. If you do not press SPACE, Burg will not run when you restart your computer.


Then use Burg Manager to change everything to suit your needs (change the default OS, install new themes or tweak some advanced parameters or just preview some Burg themes) and then restart your computer.


Some setting can be changed directly from the Burg menu - press F2 to change the theme, F3 to change the resolution or F1 to see all the available options.


Note: I've only tested Burg Manager in VirtualBox - with Ubuntu and Kubuntu (that's why there are 2 Ubuntu icons in the screenshot below), as I do not dual boot. Here's a Burg screenshot from my computer:

Burg


Thanks to saurabhneo23 for the Burg Manager tip; credits for the first image in the post: Ubuntu Radiance for Burg

Sabtu, 23 Oktober 2010

Canonical To Sue Apple?

Apple published an Mac OSX Lion sneak peak that includes a launchcer which "gives you instant access to your apps - iPad style". And this launcher is called [drums..... ] Launchpad.


Hmmm were have we heard of this before?

"Launchpad" is a registered trademark of Canonical Ltd.

A bug regarding this has been submitted to Launchpad and a comment states that the legal team is aware of this.


It will be interesting to see if Canonical will defend the Launchpad trademark and join the "everybody is suing everybody" club. And if so, will Apple sue back like they always do?

[via reddit]

Install Miro 3.5 In Ubuntu [Now With Built-In Media Converter]

Miro 3.5

Miro is a free/open source video player that automates subscribing to feeds of videos that are fetched using Bittorrent and then played in a flexible player that supports practically every format. Miro works on Windows, Linux and Mac OS X.


Miro 3.5 was released yesterday with an option to easily convert media to various video/audio formats for your media devices, better HTTP downloading performance using libcurl, option to specify the font style and encoding for the subtitles and bug fixes which include faster torrent restarting, proxy/http authentication and more.


Install Miro 3.5 in Ubuntu

To add the Miro PPA and install Miro 3.5 in Ubuntu (Karmic, Lucid and Maverick), use the following commands:
sudo add-apt-repository ppa:pcf/miro-releases
sudo apt-get update
sudo apt-get install miro


How to enable conversion for most formats in Miro 3.5

Miro convert

Using the default Ubuntu packages (ffmpeg), Miro 3.5 can't convert to most of the media so it will fail when trying to convert a video for your iPhone, Droid, G2 and so on (when trying to convert to these formats, you'll get an error related to libfaac). That's because the ffmpeg package in the official Ubuntu repositories has not been build with libfaac support.

To fix this (I know, I hate that everything needs fixing too, but this one is just an extra installation):


2. Install libavcodec-extra-52:
sudo apt-get install libavcodec-extra-52

Now the new video conversion feature in Miro 3.5 should work with any format (well, except for PSP, I didn't have any luck with that):

Miro convert


Download Miro 3.5 for Windows, Mac OSX and source files.

Elementary Emerald Theme

Elementary Emerald

WebUpd8 reader Ricardo Ferreira writes:

I've been using the elementary theme for quite some time. I don't know why, today I thought about searching for an emerald theme that would match elementary and provide some nice, smooth edges compared to Metacity.

And he found an Elementary Emerald theme which he then slightly modified to closely replicate the Metacity theme.

Download Ricardo's slightly modified Elementary Emerald theme or download the original theme.


Thanks to Ricardo for the tip and screenshot!

Jumat, 22 Oktober 2010

New SopCast Player PPA Comes With Fixed Packages For Ubuntu 10.10

Roberto @ LFFL created a new SopCast PPA (he already had SopCast packages in a different PPA along with some other packages - for Lucid only) for Ubuntu 10.10 Maverick Meerkat so you no longer have to manually download .deb files and apply a fix to get Sopcast player to start.

To add the SopCast PPA and install Sopcast Player in Ubuntu 10.10, use the following commands:
sudo add-apt-repository ppa:ferramroberto/sopcast
sudo apt-get update
sudo apt-get install sopcast-player

The above PPA also has packages for Ubuntu 10.04, but SopCast won't work if you're using VLC 1.1.x.

Note: I've using Ubuntu 32bit so I've only tested the 32bit packages and I do not know if it works for 64bit (this is because the instructions in our previous SopCast post only seemed to work on 32bit).


The new Sopcast version however still has one of the bugs I was telling you about: "show controls" and fullscreen don't work. To fix this too, in the Preferences, on the "Player" tab, select "Use External Player" and under "Command" enter "vlc" (without the quotes).

Thanks to Roberto @ LFFL for the PPA!

Video: How To Customize Avant Window Navigator - Lucido Style

Because we get a lot of comments asking what's the dock / launcher in some of the screenshots on WebUpd8 and just pointing to Avant Window Navigator is not enough, I though I'd create a video on how to customize the Avant Window Navigator Lucido style:


(Watch it in HD)


In the above video I just mess around with the settings so you can see how to customize the AWN Lucido style. As you can see, creating your own theme is very easy. If you want to use a pattern as a background, create your own or simply search Google for "patterns".

And here is what you'll need to get Avant Window Navigator to look like in the video:

  • Avant Window Navigator 0.4.1 trunk (the version in the Ubuntu repositories doesn't have the Lucido style!): installation instructions
  • And maybe you also want to use DockBarX with Avant Window Navigator as the taskbar (my taskbar icons look like Faenza but they aren't, it's the DockBarX theme I'm using that looks like that): install DockBarX for Avant Window Navigator


Thanks to Hadret for the suggestion!

Kamis, 21 Oktober 2010

Install (Fixed) SopCast Player In Ubuntu 10.10 Maverick Meerkat (With VLC 1.1.x)

Linux SopCast Player

Update: A new PPA comes with fixed Ubuntu 10.10 Linux Sopcast Player packages so use that instead of this manual fix.

SopCast Player is a Linux GUI front-end for the p2p streaming technology developed by SopCast. SopCast can play various TV channels online (watch football games, HBO, AXN Movie and so on) for free. Besides the default channel list, you can find many more (local or international) channels by simply searching Google.

The Linux SopCast Player doesn't start in Ubuntu 10.10 Maverick Meerkat - if you try to run it, you'll get an error like this:
andrei@andrei-desktop:~$ sopcast-player
Traceback (most recent call last):
File "/usr/share/sopcast-player/lib/sopcast-player.py", line 1783, in
pySop = pySopCast()
File "/usr/share/sopcast-player/lib/sopcast-player.py", line 371, in __init__
self.vlc = VLCWidget.VLCWidget(*p)
File "/usr/share/sopcast-player/lib/VLCWidget.py", line 28, in __init__
self.player=instance.mediacontrol_new_from_instance()
AttributeError: 'Instance' object has no attribute 'mediacontrol_new_from_instance'


But thanks to a fix by ilabor, you can easily get Linux Sopcast Player to start in Ubuntu 10.10 (with VLC 1.1.x).

To use Linux SopCast Player in Ubuntu 10.10 (or in Ubuntu 10.04 - if you're using VLC 1.1.x), firstly download and install Sopcast Player and its dependencies:

  • 32bit: libstdc++5, sp-auth, sopcast-player
  • 64bit: sp-auth, sopcast-player. If you get an error about a missing lib32stdc++ dependency (only if you get such an error!), install lib32stdc++5 too. If it still doesn't work, there's nothing I can do as this package seems to create some issues on 64bit (but it works just fine on 32bit).


Please note that the libstdc++5 download started quite slowly for me but the download eventually worked so that might be the case for you too.

Once you've installed the above packages for your architecture, use the following commands to apply the fix:

sudo apt-get install unzip
cd && wget http://www.mattrudge.net/files/sopcast-player_vlc1.1x-fix.zip
unzip sopcast-player_vlc1.1x-fix.zip
sudo mv vlc.py /usr/share/sopcast-player/lib/
sudo mv VLCWidget.py /usr/share/sopcast-player/lib/


At this point, SopCast player should start (if it doesn't, reinstall it) but the "show controls" and fullscreen don't work. To fix this too, in the Preferences, on the "Player" tab, select "Use External Player" and under "Command" enter "vlc" (without the quotes).


Update: A new PPA comes with fixed Ubuntu 10.10 Linux Sopcast Player packages so use that instead of this manual fix.

Thanks to somloirichard.hu for the info and ilabor for the fix!

Try Something Different: Divergence IV - "A New Hope" (GTK & Emerald Theme) [Post Updated!]

Divergence IV

Divergence IV - "A New Hope" is a very cool looking new theme which gives a slick look to your desktop. I'm not an Emerald fan, but the truth is you can't do something as beautiful as the Divergence IV - "A New Hope" Emerald themes with Metacity.

The pack incluses a beautiful GTK2 theme as well as 3 Emerald themes: 2 "A New Hope" themesL one with the buttons on the right side and one with the buttons on the left and a theme called "The Empire strikes back" which you can see in the Nautilus Elementary screenshot further down in the post.


Install the required packages


To use Divergence IV, you'll need Emerald and CompizConfig Settings Manager (to make Emerald default):
sudo apt-get install emerald compizconfig-settings-manager

The latest Murrine Engine (step not required for Ubuntu 10.10 Maverick Meerkat):
sudo add-apt-repository ppa:murrine-daily/ppa
sudo apt-get update
sudo apt-get install gtk2-engines-murrine

Then, download Faenza Dark icons (edited) and the Divergence IV - "A New Hope" theme pack.

Usage


1. Extract the downloaded .zip archive and copy the "A-New-Hope" and "A-New-Hope (gtk-breadcrumbs)" folders to ~/.themes/. The "A-New-Hope (gtk-breadcrumbs)" theme uses the default Nautilus breadcrumbs while A-New-Hope will give you slick new Nautilus Elementary breadcrumbs (if using Nautilus Elementary):

Divergence IV
(Nautilus Elementary breadcrumbs and the new "The Empire strikes back" Emerald theme in Divergence IV - "A New Hope" 0.5)


Please note that you might have to manually set the icon theme to Faenza Dark (for some reason, the theme displayed an error about Faenza Dark not being even though it's installed).

Then for the Emerald themes go to System > Preferences > Emerald Theme Manager, click "Import" and browse for the 3 extracted Emerald themes.

2. In CompizConfig Settings Manager (System > Preferences), click the "Window decorations" plugin and under the command field, enter:
emerald --replace

Then to use the Emerald theme, press ALT + F2 and enter the same command as above.


Update: version 0.4 was using the Awoken icon theme but the new version 0.5 released on October 23 is using Faenza so I've updated the instructions. Also, version 0.5 includes a variation of the GTK theme with Nautilus Elementary breadcrumbs as well as a new "Ambiance-ish" Emerald theme (see the Nautilus Elementary screenshot above).


Don't like Divergence IV? Try the latest Elementary theme 2.0 or the Equinox themes.

Opera 11 Alpha With Extensions Support Is Available For Download

Opera 11 extensions

That was fast! Just last week we were telling you about Opera getting extensions support and today, Opera 11 alpha has been released. The extensions work just like in Chromium: an icon is displayed next to the search bar (or no icon at all) and you also get an extensions page from where you can disable or uninstall the extensions (to reach this page you either have to right click any extension and select "Manage Extensions" or press Ctrl + Shift + E).

There aren't many extensions available for now, but I'm sure we'll see a lot of them soon and since they seem to work just like in Chromium (they use HTML, CSS and JavaScript), we might even see Chromium extensions "ported" to Opera.

To try out the new extensions or submit your own, see https://addons.labs.opera.com/

Besides extensions support, Opera 11 alpha also comes with Opera Presto 2.6.37 which brings improved performance and other enhancements.


Download Opera 11 Alpha (includes .deb files) - remember, this is a test version so expect to find bugs!

Rabu, 20 Oktober 2010

Manhattan OS Rebranded As Jupiter OS; Ditches Ubuntu For Debian

Jupiter OS

Manhattan OS was a great Ubuntu remaster you might remember reading about on WebUpd8. I say "was" because it doesn't exist anymore - you can't download it and there won't be any new versions, not under the "Manhattan OS" name. That's because Kevin wanted to go with Debian instead of Ubuntu and as a result, he is currently working on a new Linux distribution called Jupiter OS.

Manhattan OS served as a good test bed for us to figure out where we belonged in the Linux world. We found that being simple is great, but being fun is even better; so why not take the "best of" everything (even across distribution platforms) and make it singular but fun! That's what Jupiter OS is all about.

- Kevin McDole


You might think that's just another Debian based distro / remaster. Well, it's not:

Firstly, Jupiter OS will be a rolling release Linux distribution! And secondly, besides all the great applications that will come by default (I have no info on that, but some applications from Manhattan OS will probably be available in Jupiter OS too), Jupiter OS will also have all the goodies that are only available in Ubuntu (well, by default, because they now exist in some other distribution repositories), such as NotifyOSD or Indicator Applet - thanks to Hadret's repository (from which Jupiter OS will most likely include Nautilus Elementary and other applications by default).


Jupiter OS is not yet available for download, but a preview release is expected by the end of this month.


For news about Jupiter OS, see its Facebook page.

Configure Wine With Vineyard [Version 0.1.5 Beta, Released]

Vineyard

Vineyard is a collection of tools you can use as a replacement for Wine's default configuration tool, designed to make it easier to manage Wine. Something like this should really be integrated into Wine - just because Wine is for well, running Windows applications doesn't mean it can't use a native configuration tool.

Vineyard has an Ubuntu PPA but the version in the PPA is very old and Christian, the Vineyard developer says the latest Vineyard 0.1.5 beta is more stable than the "stable" version available from the PPA. Further more, 0.1.5 beta also comes with new features: new tools to simulate reboot, shutdown, close/kill programs an so on (on the Tools tab), ISO files are now supported as drive devices and you can set flat style menus from the Appearance tab.

Vineyard 0.1.5 beta

Vineyard also comes with a launcher that enables you to run an application in a configuration you choose (like: the Windows version, screen resolution, what applications are installed and so on).

What about Steam? Well, I know a lot of you run it under Wine so you'll like this: Steam works pretty well with Vineyard (so says the announcement, I do not use Steam so I did not test this) and the games are listed like any other application (under the Programs tab) - so you can run or uninstall them with a click.


Another cool feature in the latest Vineyard 0.1.5 beta is Ubuntu appindicator support:

Vineyard appindicator


While this can't be used to control the applications, it nicely lists all the Wine applications in one appindicator and you can see a log or close the application from within the appindicator. This feature only works for the applications you run from Vineyard (either the GUI or vineyard-cli) - you can launch applications using Vineyard from the "Programs" tab.

To use the appindicator, you have to run it manually so press ALT + F2 and enter:
/usr/bin/vineyard-indicator


Update: only a couple of hours after we posted this, a new beta was released which allows you to open Wine applications with Vineyard via right click:

Vineyard open with

And you'll then be able to select the configuration to run it under and additialy, install some required packages:

Vineyard run


This was also available in the previous beta, but there was no .desktop file you you had to do this from the command line.


Update 2: Vineyard got a testing PPA. To add the PPA and install Vineyard in Ubuntu, use the following commands:
sudo add-apt-repository ppa:cybolic/vineyard-testing
sudo apt-get update
sudo apt-get remove python-wine vineyard
sudo apt-get install python-wine vineyard

The removal of Vineyard and python-wine is required if you've installed Vineyard 0.1.5 beta by downloading the .deb files from its website (that's why the above instructions include a "remove" command) - although the Vineyard version in the PPA is newer, the actual version number is lower so you have to remove the old packages to be able to install and stay up to date with the latest Vineyard beta builds from this PPA.

Once installed, you can find Vineyard under System > Preferences > Wine Applications.


Remember, Vineyard 0.1.5 is in beta so report all the bugs @ Launchpad.


[info via Vineyard; thanks to Christian Dannie Storgaard for the tip!]

Selasa, 19 Oktober 2010

Install Gnome Shell (From GIT) In Ubuntu 11.04 / 10.10

Gnome Shell GIT screenshot - Ubuntu 10.10 Maverick Meerkat

Unfortunately there are no Gnome Shell daily builds in the Ricotz testing PPA anymore (for any Ubuntu version) and even though Ubuntu 10.10 has just been released, the Gnome Shell version in the official Ubuntu repositories is quite old so if you want to run the latest version of Gnome Shell (from GIT), you'll have to compile it. Fortunately, this is not as hard a I initially imagined (because the last time I've compiled Gnome Shell - around Ubuntu 9.04, it was a pain) thanks to the Gnome Shell testing thread @ Ubuntuforums.

By compiling Gnome Shell using the instructions in this post, all the packages the Gnome Shell script will download and compile will not replace any existing libraries and it will install in your home folder, so you don't have to worry about breaking stuff on your system (excluding here the build dependencies of course, which are usual packages from the Ubuntu repositories and will install just like any other package).

Before starting the process, here is a video I've just recorded with the latest Gnome Shell which includes a new notification area (notice how Dropbox is now only displayed in the Activities view) as well as a cool new feature (which is thanks to the latest Mutter): side-by-side tiling:


I didn't upload the video to YouTube because the video quality is very bad and I couldn't get it to record without the flickering and blue screen no matter what application I used (I've tried Recordmydesktop, ffmpeg and Kazam (which also uses ffmpeg)). Even so, YouTube makes it a lot worse after encoding (it blurs all the text) - although when I record a video under the standard Ubuntu 10.10 desktop, the videos are usually decent in quality. Also, the built-in record tool in Gnome Shell doesn't work anymore.

In the video, you can also spot the "attaching modal dialogs to their parents" which also comes with visual effects of sliding in and dimming the parent window (the attached window can be seen when trying to install the Elementary theme).


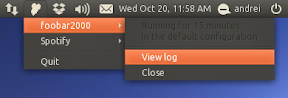
Update November 13, 2010: here is another screenshot featuring the new default Gnome Shell (Gnome 3) window border theme:

Gnome shell default theme

Compile Gnome Shell in Ubuntu 11.04 / 10.10

Below you'll find the exact steps which got Gnome Shell up and running on my Ubuntu 11.04 / 10.10:

1. Install the dependencies and download the build setup script:

Firstly, add the Vala PPA - required for the latest Vala (this step was introduced on January 19th, 2011):
sudo add-apt-repository ppa:vala-team/ppa && sudo apt-get update

Now install the dependencies:
sudo apt-get install curl jhbuild libjasper-dev libdconf0 libtiff4-dev libgstreamer0.10-dev libcroco3-dev xserver-xephyr xulrunner-dev python-dev mesa-utils mesa-common-dev libreadline5-dev libgl1-mesa-dev libwnck-dev librsvg2-dev libgnome-desktop-dev libgnome-menu-dev libffi-dev libgtk2.0-dev libgconf2-dev libdbus-glib-1-dev gtk-doc-tools gnome-common git-core flex bison automake build-essential icon-naming-utils autopoint libcanberra-dev libpulse-dev libvorbis-dev gnome-settings-daemon-dev libxklavier-dev libpam0g-dev libtasn1-3-bin libupower-glib-dev libgnome-keyring-dev libgtop2-dev libvala-0.12-dev valac libcups2-dev evolution-data-server-dev libecal1.2-dev libedataserver1.2-dev libedataserverui1.2-dev iso-codes sqlite3 libsqlite3-dev libproxy0 libproxy-dev libdb-dev libdb4.8 gperf libsoup2.4-dev libsoup-gnome2.4-dev
cd
curl -O http://git.gnome.org/browse/gnome-shell/plain/tools/build/gnome-shell-build-setup.sh


2. Export /home/YOUR_USERNAME/bin path


You need to edit the next command, by replacing "andrei" with your username:
export PATH=$PATH:/home/andrei/bin

3. Start the build process:
cd
chmod +x gnome-shell-build-setup.sh
./gnome-shell-build-setup.sh
jhbuild build


If you use Firefox 4.0 from the Mozilla Daily PPA, step 3 is different for you: run the above commands until "./gnome-shell-build-setup.sh", then do not run "jhbuild build" yet! Instead, install xulrunner 1.9.2:
sudo apt-get install xulrunner-1.9.2-dev

The above command will remove xulrunner-2.0-dev - that's ok. Then you can start building Gnome Shell:
jhbuild build


Now sit back and wait - this will take some time depending on your Internet connection speed and processor.

At this point you may get an error which looks like this:

A. Possible error #1:
/home/andrei/gnome-shell/install/lib/libgio-2.0.so: undefined reference to `g_main_context_invoke'
collect2: ld returned 1 exit status
[...]
*** Error during phase build of gnome-shell: ########## Error running make *** [24/28]

You may get this error on a different step (Gnome Shell keeps getting bigger), but don't mind that, just look if you get "undefined reference" errors. If you do, do not close the terminal! Open a new terminal and run the following command:

- for 32bit:
rm ~/gnome-shell/install/lib/*.la

- for 64bit:
rm ~/gnome-shell/install/lib64/*.la

Now, in the terminal where you ran the "jhbuild build" command and got the error, something like this should have been displayed at the bottom:
  [1] Rerun phase build
[2] Ignore error and continue to install
[3] Give up on module
[4] Start shell
[5] Reload configuration
[6] Go to phase "wipe directory and start over"
[7] Go to phase "configure"
[8] Go to phase "clean"
[9] Go to phase "distclean"

Here, enter "6" (without the quotes), then you will be asked to type "yes" to continue the process. Now Gnome Shell should build successfully (at least that was the case for me). If Gnome Shell has been built successfully, you should see this when the process is done:
*** success *** [28/28]

B. Possible error #2:

~/gnome-shell/source/gnome-settings-daemon/gnome-settings-daemon/main.c:274: undefined reference to `notify_init'
collect2: ld returned 1 exit status
make[3]: *** [gnome-settings-daemon] Error 1
make[3]: Leaving directory `/home/arindom/gnome-shell/source/gnome-settings-daemon/gnome-settings-daemon'
make[2]: *** [all] Error 2
make[2]: Leaving directory `/home/arindom/gnome-shell/source/gnome-settings-daemon/gnome-settings-daemon'
make[1]: *** [all-recursive] Error 1
make[1]: Leaving directory `/home/arindom/gnome-shell/source/gnome-settings-daemon'
make: *** [all] Error 2
*** Error during phase build of gnome-settings-daemon: ########## Error running make *** [26/28]

This occurs because you need a newer version of libnotify. To fix it, use the following commands:
cd ~/bin
./jhbuild shell
cd ~/gnome-shell/source
git clone git://git.gnome.org/libnotify
cd ./libnotify
./autogen.sh --prefix $HOME/gnome-shell/install/
make && make install

Thanks to Arindom and wersdaluv for this second fix!


C. Possible error #3: build fails due to missing libxklavier >= 5.1.

If you get the following error:

checking for LIBXKLAVIER... no
configure: error: Package requirements (libxklavier >= 5.1) were not met:

Requested 'libxklavier >= 5.1' but version of libxklavier is 5.0

Consider adjusting the PKG_CONFIG_PATH environment variable if you
installed software in a non-standard prefix.

Alternatively, you may set the environment variables LIBXKLAVIER_CFLAGS
and LIBXKLAVIER_LIBS to avoid the need to call pkg-config.
See the pkg-config man page for more details.
*** Error during phase configure of libgnomekbd: ########## Error running ./autogen.sh --prefix /home/andrei/gnome-shell/install --libdir '/home/andrei/gnome-shell/install/lib64' --disable-static --disable-gtk-doc *** [23/32]

You need to run the following command:

32bit:
sudo gedit /usr/lib/pkgconfig/libxklavier.pc
64bit:
sudo gedit /usr/lib64/pkgconfig/libxklavier.pc

And change the Version (it's on line 9 for me) from "5.0" to "5.1". Then save the file and enter "1" in the terminal to run the configure phase again ("[1] Rerun phase configure").

This solution was suggested on the Gnome Shell mailing list. It's not pretty, but libxklavier 5.1 wasn't released yet.


D. Possible error #4: Error configuring Clutter:

*** Error during phase configure of clutter: ########## Error running ./autogen.sh --prefix /home/jacky/gnome-shell/install --libdir '/home/jacky/gnome-shell/install/lib'  --disable-static --disable-gtk-doc  *** [12/34]

This is most probably a temporarily issue, but I'll post a fix until it gets fixed anyway. Open a terminal and copy/paste this:
cd ~/gnome-shell/source/clutter
gedit build/autotools/Makefile.am.changelog

And modify this line:
MAINTAINERCLEANFILES += $(srcdir)/ChangeLog $(srcdir)/ChangeLog.pre-*

(it's on line 19 for me) so that it looks like this:
MAINTAINERCLEANFILES = $(srcdir)/ChangeLog $(srcdir)/ChangeLog.pre-*


Basically you have to remove the "+" sign in front of the equal sign.

Save the file and re-run the configure phase (enter "1" in the terminal).


E. Possible error #5: Requested 'polkit-agent-1 >= 0.100' but version of polkit-agent-1 is 0.99:

Requested 'polkit-agent-1 >= 0.100' but version of polkit-agent-1 is 0.99

Consider adjusting the PKG_CONFIG_PATH environment variable if you
installed software in a non-standard prefix.

Alternatively, you may set the environment variables MUTTER_PLUGIN_CFLAGS
and MUTTER_PLUGIN_LIBS to avoid the need to call pkg-config.
See the pkg-config man page for more details.
*** Error during phase configure of gnome-shell: ########## Error running ./autogen.sh --prefix /home/andrei/gnome-shell/install --libdir '/home/andrei/gnome-shell/install/lib' --disable-static --disable-gtk-doc *** [31/34]


This is because the polkit-agent version was bumped yet jhbuild still tries to compile version 0.99 but it needs version 0.100.

The fix open a new terminal (but don't close the terminal in which you are compiling shell) and type these:
cd ~/gnome-shell/source
wget http://hal.freedesktop.org/releases/polkit-0.100.tar.gz
rm -rf polkit-0.99/
tar -xvf polkit-0.100.tar.gz
cd polkit-0.100/
./configure --prefix $HOME/gnome-shell/install/
make && make install


Now go back to the terminal in which you're bulding Gnome Shell (where you ran jhbuild) and enter "1" so that it starts the configure step again. Now it should work.


F. Possible error #6 (when starting Gnome Shell): Gnome Shell builds successful but does not start:

andrei@andrei-desktop:~$ ~/gnome-shell/source/gnome-shell/src/gnome-shell --replace
mutter: symbol lookup error: /home/andrei/gnome-shell/install/lib/gtk-3.0/modules/libcanberra-gtk-module.so: undefined symbol: gtk_quit_add

To fix it, run the following command:

32bit:
rm ~/gnome-shell/install/lib/gtk-3.0/modules/libcanberra-gtk-module.so

64bit:
rm ~/gnome-shell/install/lib64/gtk-3.0/modules/libcanberra-gtk-module.so


G. Possible error #7 (when starting Gnome Shell): Gnome Shell cannot find libmozjs.so:

If you get an error like this:

andrei@andrei-desktop:~$ ~/gnome-shell/source/gnome-shell/src/gnome-shell --replace

(mutter:13979): mutter-WARNING **: Could not load library [/home/andrei/gnome-shell/source/gnome-shell/src/libgnome-shell.la (libmozjs.so: cannot open shared object file: No such file or directory)]

mutter-ERROR **: failed to load plugins
aborting...
Shell killed with signal 5

Run the following commands:
cd /usr/lib
sudo ln -s /usr/lib/xulrunner-1.9.2.16pre/libmozjs.so libmozjs.so

The libmozjs.so path may not be "/usr/lib/xulrunner-1.9.2.16pre/libmozjs.so" for you if you're using a different version. You can locate it using:
locate libmozjs.so

And then replace the path in the last command above. Then start Gnome Shell - it should start now.


H. Fix logoff / suspend / shutdown

If the logoff / suspend / shutdown doesn't work for you, run the following command:
ln -s /usr/bin/gnome-session-save gnome-shell/install/bin/gnome-session-quit

Thanks to Habilain for this fix!


If you get any other errors while updating Gnome Shell, remove all the Gnome Shell directories and start over!


4. Start Gnome Shell:

In a terminal, enter:
~/gnome-shell/source/gnome-shell/src/gnome-shell --replace

Exit Gnome Shell

To return to your normal desktop, press ALT + F2 and enter:
debugexit


Updating Gnome Shell

Whenever you want to update to the latest version of Gnome Shell (from GIT), all you have to do is run this command:
cd && jhbuild build --force --clean

You may run into the error I pointed out at step 3 so apply the fix mentioned there and it should work. Hopefully this will no longer be necessary soon.


Important notes:
  • While the exact instructions in this post worked for me, it may not be the case for you. I most probably won't be able to help you because I if I cannot reproduce the exact error you get, it will be very difficult to find the cause and how to fix it. To find the fix for your error, you can try searching the Gnome Shell testing thread @ Ubuntuforums.


The instructions in this post are from THIS Gnome Shell thread @ Ubuntuforums. Thanks to xtoudi for the step 3 fix! You can search that thread if you encounter any issues while compiling Gnome Shell - you might find your answer there.


Update: the instructions in this post also work in Ubuntu 11.04. Using this method of installing GNOME Shell, you can run both Gnome Shell and Unity (not in the same time though, obviously, but you can create a separate session for each) in Ubuntu 11.04