Powered By

Powered by Blogger

Kamis, 30 Desember 2010

Updated: Ubuntu And Fedora Wallpaper Pack [Official Wallpapers]

Ankur has updated the wallpaper collection we've mentioned a while back that includes all the Ubuntu and Fedora official wallpapers in the 4:3 and 16:10 formats. The update includes the Fedora 14 and Ubuntu 10.10 wallpapers along with 10 extra wallpapers (from Linux Mint, Mandriva and the latest KDE 4.6 wallpaper):


Download Ubuntu & Fedora wallpaper pack (includes 84 wallpapers): Mirror 1 | Mirror 2


Thanks to Ankur for the tip!

Browse more wallpaper posts on WebUpd8.

Foobnix 0.2.3 Comes With UI Changes, Many Bug Fixes

Foobnix 0.2.3

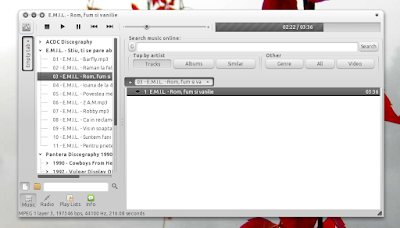
Foobnix (click HERE for our initial Foobnix review) 0.2.3 has been released today, fixing a lot of the bugs in the previous versions, including some which caused display errors with most GTK themes. But that's not all that's new in the latest Foobnix 0.2.3 - changes in the latest version include:
  • Music folders in one or multiple tabs
  • Compact pull-down menu, the ability to display the menu as a panel
  • Improved CUE support
  • Customizable user themes (these are more like personas) - you can basically add any wallpaper / image as a background for Foobnix
  • Transparency of the main window
  • The tabs are now saved and restored when you start Foobnix
  • Actions on tabs (close, open, rename)
  • Improved performance and better startup speed
  • Many bugs fixed


Foobnix 0.2.3 custom theme
(Foobnix 0.2.3 using a custom "theme" which is actually just a wallpaper)

Foobnix 0.2.3
(Foobnix with ~60% opacity)

Install Foobnix 0.2.3 in Ubuntu

Foobnix comes with an Ubuntu PPA (for Ubuntu 10.04 and 10.10) - add the PPA and install Foobnix using the following commands:
sudo add-apt-repository ppa:foobnix-player/foobnix
sudo apt-get update
sudo apt-get install foobnix

Rabu, 29 Desember 2010

Atolm: A New, Great Looking Dark Theme Created By The Orta Designer

Atolm GTK theme

Atolm is a new dark GTK theme created by SkiesOfAzel (who is also behind the very popular Orta GTK theme) in collaboration with MonkeyMagico who's mockups were the inspiration for this new theme.

To use Atolm, you'll need the Murrine, Pixbuf and Equinox GTK engines. The Equinox GTK engine comes with an Ubuntu PPA so to install it, use the following commands:

sudo add-apt-repository ppa:tiheum/equinox
sudo apt-get update
sudo apt-get install gtk2-engines-equinox


Then download Atolm, extract the downloaded .zip archive and you'll have a .tar.gz which you can drag'n'drop onto the Appearance Preferences 'Themes' tab to install the theme.

SkiesOfAzel recommends the Aworken icons for this theme, but I would personally recommend F-Dark Faenza. If you know other icon themes that look good with Atolm (or any other dark themes), let us know in the comments!


Thanks to SkiesOfAzel for the tip | Screenshot via Atolm DeviantArt page.

Use Gnome Panel As A "Wingpanel" [Quick Tip]

Gnome Wingpanel

WebUpd8 reader Justin has sent us a really interesting tip for using the Gnome panel as "Wingpanel" instead of the actual Wingpanel or Avant Window Navigator.

The trick is to get a floating Gnome panel (the rest is pretty much obvious). Read on!


1. Remove all the panel applets that you don't want to use - like the menu.

2. Right click the panel, select "Propreties" and on the "General" tab, uncheck the expand option and enable autohide. Now simply drag the panel to the right side of the screen.

3. Now let's simulate a "floating effect" for the Gnome panel (that means the panel will always be visible but it covers the applications as opposed to when the panel is always visible - when the windows cannot go underneath the panel):

Press ALT + F2 and enter "gconf-editor", navigate to apps > panel > toplevels and click "panel_0" or "panel_1" (it depends on the panel you want to apply this for). Then, modify the "hide_delay" key value to "2147483647" which is the maximum supported value. This is the panel hide delay which is now set to "2147483647" so the panel will take around 600 hours to hide (so it's not really going to hide), thus becoming a "floating panel".

Tip thanks to Justin | via Justin Stories.

Selasa, 28 Desember 2010

Integrate Thunderbird In The Ubuntu Messaging Menu [PPA]

Thunderbird messaging menu

So you're looking for a really easy way to integrate Thunderbird in the Ubuntu Messaging Menu? You can try a package I've recently came across (called "xul-ext-indicator") that is available in a PPA, which adds Thunderbird to the Messaging Menu and provides quick access to your contacts, compose a new mail and unread emails. Using this package, you'll also get NotifyOSD notifications when new mail arrives.

To add the PPA and install xul-ext-indicator in Ubuntu 10.10 Maverick Meerkat, use the following commands:
sudo add-apt-repository ppa:ruben-verweij/thunderbird-indicator
sudo apt-get update
sudo apt-get install xul-ext-indicator

For NotifyOSD notifications, also install the following package:
sudo apt-get install libnotify-bin

Note: I've tested it with Thunderbird 3.1.x and it worked great on all 3 computers I've used (as opposed to some other solutions for adding Thunderbird to the Messaging Menu I've tried out).

CloudSN (Cloud Services Notifications) Update Finally Brings Twitter OAuth Support

Cloudsn

CloudSN (Cloud Services Notifications) is an application you can use to display notifications when you have new emails (POP3 and IMAP), new Identi.ca messages, Google Reader unread items or it can watch any RSS feed for changes (which means you can use it for Facebook too). For a complete review, see our previous post on CloudSN.

Back when Twitter introduced OAuth for all applications, CloudSN stopped working with Twitter but an update finally brings Twitter OAuth support for CloudSN.


CloudSN notification

The new version is available in the CloudSN PPA for Ubuntu 10.10 Maverick Meerkat (only!) - add the PPA and install CloudSN using the following commands:

sudo add-apt-repository ppa:chuchiperriman/cloudsn
sudo apt-get update
sudo apt-get install cloudsn


Once installed, run it from Applications > Internet > Cloud Services Notifications.

AriOS: Light Interface And Heavy Application Base In A Ready To Use Ubuntu Remaster

AriOS

AriOS is the successor of mFatOS, an Ubuntu remaster we talked about a while back. AriOS 2.0 was released today and it's based on Ubuntu 10.10 - the new version tries to replicate Unity but as opposed to Unity, it's customizable thanks to Avant Window Navigator. In AriOS, everything works out of the box and most popular applications are installed by default which I'm sure those with a limited Internet connection will appreciate.


First impressions / looks

The AriOS interface is inspired by Unity but instead of the Unity "dock" it uses Avant Window Navigator which is a lot more customizable, with DockBarX for the launcher / task manager. Using AWN, you get all the amazing applets that come with it and DockBarX offers window previews, fancy menus and more.

No, it's not Wingpanel on the top-right corner but another instance of Avant Window Navigator designed to replicate a floating appindicator, but unlike Wingpanel (and unlike Unity), there's also a notification area (systray) available. When maximizing a window, the top-right AWN appindicator/notification area nicely covers the application which gives both a slick look and more screen real-estate.


AriOS themes

The default AriOS theme is a customized blueish Ambiance and the icons are a mod of MeliaeSVG theme. For those who prefer dark themes, AriOS provides a dark version of it's default theme - you can change it from the Appearence Preferences. But that's not all - AriOS comes with all the popular GTK themes installed by default: Orta, Lucidity (and variations), Equinix (and variations), Elementary and of course, icon themes such as: Elementary, Candy and Faenza.

Switch between Avant Window Navigator and classic Gnome panels in seconds


AriOS

AriOS comes with a somewhat unique feature (it seems Ubuntu 11.04 will also have something that will let you chose): by default, it uses Avant Window Navigator instead of the classic Gnome panels but if you open a terminal and type "gpanel", then log out and log back in, AWN will be replaced by the Gnome panels. If you want to go back to using Avant Window Navigator, open a terminal again and type "awn", then log out and log back in.


Default applications


AriOS

Because AriOS is designed to be a Linux distro / remaster that you can use right away, it comes with all the cool applications that most blogs write about these days: Synapse, Nautilus Elementary, Kazam (screencast tool), Ubuntu Tweak, Grub Customizer, PhotoFilmStrip, Gloobus Preview, Granola as well as two browsers: Firefox and Chrome and Clementine for the music player (but Rhythmbox is also available). Other default applications include: gThumb, Shutter, TrueCrypt, Thunderbird, Empaty, Uget, Transmission, NTM, Geany, Cheese, Brasero, Arista Transcoder, Wine, our very own Y PPA Manager and more.

Since now everybody uses Twitter / Identi.ca, AriOS has this covered too by including the most popular Twitter client for Linux: Hotot.

For a video player, AirOS comes with the application everybody uses (yet it's not default in any Linux distribution): VLC (but Totem and Smplayer are also available). Image editing is also covered for both the novice and advanced: GIMP, Inkscape and Pinta are all installed by default.

And since no OS is ready to use out of the box without codecs, you'll be glad to know AriOS comes with everything you need to play almost any audio or video files. Further more, for those who don't have full internet access, AriOS comes with offline installer for proprietary Nvidia and ATI (AMD) graphics drivers (simply double click the icon on the desktop).


Tweaks


AriOS

I was telling you about a tweak easily switch to Gnome panels - that's not the only one included in AriOS. Some other tweaks can be applied manually - these are usually things only advanced users do, but thanks to AriOS, everyone can fix the Plymouth for restricted graphics drivers or install a "200 lines" patched custom kernel.


Included "manual" tweaks:

- Install the "200 lines patch" Linux Kernel without downloading it: simply open a terminal and type "magic".
- Fix the Plymouth for proprietary Nvidia and ATI graphics drivers: the script we've written about a while back is included in AriOS - to apply it, open a terminal and type "fixplymouth".
- Gimpbox (single window Gimp for the stable Gimp version) is yet another script included by default - to run it, type "gimpbox".

Some further tips and tricks can be found inside the "Tips.pdf" file in the Help folder (you can find it on the desktop). Here, you'll also find some further info on AriOS as well as some video tutorials.


Those are of course tweaks that you can apply by yourself but many tweaks are already applied by default. For instance, since the default interface uses AWN without any Gnome Panels, the Gnome Run dialog can't work but AriOS has Synapse binded to the ALT + F2 keys (as well as ALT + SPACE) so only the looks change, the functionality is the same. To discover all the tweaks in AriOS, try it for yourself!


Downsides? There's only one to AriOS: the large number of default applications, many of which serve the same purpose. While that's great for those with no / limited internet connection, it might be annoying for the rest. On the other hand, if you only want some basic applications installed by default, you would install Ubuntu and not AriOS so the large number of default applications does make sense in a way.


Download AriOS

AriOS comes in two editions: International (English) and Iranian, both for 32bit only for now.

Download AriOS | AriOS website (work in progress)


Update (important!): to be able to use non-english language packs, run the following command:
sudo apt-get install --reinstall locales localechooser-data

Then you can go to the Language Support in the administration menu, install your language and press "Apply System-wide".

Senin, 27 Desember 2010

Last 2 Weeks Top Posts (Weeks 50, 51 - 2010)

  1. Install VirtualBox 4.0 (Stable) In Ubuntu, Via Repository
  2. How To Compile The Kernel In Ubuntu, The Easy Way [Video] & Download Kernel 2.6.36 .deb Compiled With The" 200 Lines Patch" For Ubuntu 10.10 Maverick Meerkat (32bit)
  3. Nautilus 3.0 Mockups: More Polish, Overlay Statusbar
  4. Dropbox 1.0 Stable Released With Selective Sync, Huge Performance Enhancements, More [How To Upgrade To 1.0 In Ubuntu]
  5. Gnome Shell Might Not Be Available In The Ubuntu 11.04 Natty Narwhal Official Repositories
  6. XBMC 10.0 "Dharma" Released With Built-In Addons System, VAAPI Support, Improved VDPAU, More
  7. 'My Weather Indicator': A New Ubuntu Weather Appindicator
  8. Get Video Acceleration For Adobe Flash Flayer (With Stage Video) In Ubuntu [VDPAU Only]
  9. Jupiter 0.0.46 Released With SATA Link Power Management And USB Autosuspend Support
  10. Unified Me Menu And Messaging Menu Mockups; Ubuntu May Get A "Silent" Mode

YaRock 0.0.41 Released With New Toolbar And IceCast / ShoutCast Radio Browser

YaRock

YaRock is a new Qt4 music player designed to provide a nice overview of your music by allowing you to browse your music collection based on the album cover art. We love YaRock here at WebUpd8, especially for it's simplicity and the nice cover art overview it provides, as well as the ability to fetch albums cover art from Last.fm.


YaRock 0.0.41 was released a few days ago, bringing lots of new features / changes:
  • New ToolBar with Prev/Next browsing, read only BreadCrumb
  • Change (MAJOR) music collection redesign (less memory usage, better performance)
  • New ShoutCast / IceCast radio browser
  • New favorite radio item (stored into xspf file)
  • New add support for remote playlist to be played diectly from radio browser
  • New Menu with tree structure and radio file
  • New add radio setting for adding/removing specific radio file
  • Change core graphic painting method improvement
  • Change core thread management improvement
  • New internal Database v8 (internal & user playlist file)
  • New remote Url and remote playlist support
  • New use of QtSingle application module
  • New playlist detail view (with up/down and search fonction)
  • Changes playlist populator (for remote playlist support)
  • New Translation support + translations French, Czech, Spanish


Roberto @ LFFL usually maintains YaRock packages in his PPAs, however the latest YaRock 0.0.41 hasn't been uploaded yet (even though it was released about 4 days ago), so I've used his packaging to build the latest 0.0.41 for Ubuntu 10.10 Maverick Meerkat.

Download YaRock 0.0.41 (for Ubuntu 10.10 Maverick Meerkat only!):

YaRock 0.0.41 comes with integrated icecast radio stations but if you want more (including ShoutCast), you can download them via its Qt-Look page. To add them, go to Collection > Collection Settings, on the Radio tab select "Add" and then in the file selection dialog select "All files" instead of just "Radio files" from the drop-down (so you can add shoutcast too) add the radio / shoutcast files you've downloaded.

Sabtu, 25 Desember 2010

How To Test Ubuntu 11.04 With Unity In VirtualBox 4.0

Ubuntu 11.04 virtualbox 4.0


Great news for those who want to try out the latest Ubuntu 11.04 Natty Narwhal with the Unity interface without booting a CD or Live USB - Unity now works in the latest VirtualBox 4.0. All you have to do to get Ubuntu 11.04 with Unity to work in VirtualBox 4.0 is to enable 3D Acceleration and obviously, install the VirtualBox Guest Additions. Read on!


Get Ubuntu 11.04 with Unity working in VirtualBox 4.0


1. Firstly, install VirtualBox 4.0.x. For installation instructions, see our previous article: Install VirtualBox 4.0.x (Stable) In Ubuntu, Via Repository

2. Download the latest Ubuntu 11.04 Natty Narwhal daily live ISO from HERE.

3. In VirtualBox, create a new virtual machine, go to its settings and on the Display tab, check the "Enable 3D Acceleration" box.

4. Now you'll need to install Natty in VirtualBox. When done, start it and proceed to step 5.

5. Install the VirtualBox Guest Additions in Natty: open a terminal (in Ubuntu Natty that runs in VirtualBox) and type:
sudo apt-get update
sudo apt-get install virtualbox-ose-guest-utils


When done, restart the virtual machine and Ubuntu 11.04 with the Unity interface should be working!

Extra tip: if Unity defaults to a classic "windows 95-ish" theme when it starts, run the following command to get the default theme back (thanks to Phillip Daddy for the tip!):
killall -9 gnome-settings-daemon && gnome-settings-daemon


Unity VirtualBox

Update April 4th, 2011: the initial instructions for installing the Guest Additions stopped working a while back so I've updated the post with new instructions that work with the latest xserver / kernel 2..6.38 (I've tested it with the latest Ubuntu 11.04 daily ISO / VirtualBox 4.0.4-70112). Thanks to Andrei Sun for the tip!


Thanks to Singh for the tip!

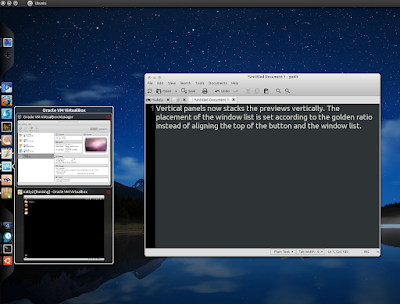
DockBarX 0.42 Brings Improved Window Previews

DockBarX 0.42

After the great new features it got two weeks ago, a new DockBarX version (0.42) has been released today, bringing some tweaks and improvements to those new features:
  • It's now possible to scroll through windows (by using mouse or keyboard shortcuts) without raising all of them.
  • Opacify now fades in and out.
  • If the previews takes up too much space to fit the screen, a list without previews will be shown instead.
  • The size of previews are now set in such a way that the window is shrunk until it fits a in box with the same size aspect ratio as the monitor (the size you set from preference window is the height of this box). Previously it was fitted into a square (size*size). This makes the height of the previews more even.
  • Vertical panels now stacks the previews vertically. The placement of the window list is set according to the golden ratio instead of aligning the top of the button and the window list.
  • For those of you who doesn't like the new menu: The old gtk menu is back and you can choose to use it from preference window.

Install DockBarX 0.42 in Ubuntu

DockBarX 0.42 is of course available in the WebUpd8 PPA for Karmic, Lucid, Maverick and Natty. Add the PPA and install DockBarX 0.42 using the following commands:

sudo add-apt-repository ppa:nilarimogard/webupd8
sudo apt-get update
sudo apt-get install dockbarx dockbarx-themes-extra

The last command above will install both DockBarX and the extra DockBarX themes pack. To also install the Avant Window Navigator DockBarX applet, use the following command:


sudo apt-get install awn-applet-dockbarx


If you're not using Ubuntu, download DockBarX via Gnome Look.

Fix The "Open With" Menu When Using MS Office Under Wine [Quick Tip]

MS Office wine open with

This is a tip sent by WebUpd8 reader Bhaismachine. He writes:

On installing MS Office using Wine on Ubuntu, the "open with" menu produces more than one instance of the MS Office apps. I have been solving this issue since really long time on my each fresh install of Ubuntu by opening 'main menu' app and then removing all those entries from 'other' section of main menu.

MS Office menu fix

This is not an issue just with MS Office but with other applications too. To clean the "Open with" menu, right click the Ubuntu menu, select "Edit menus" and on the "Other" section you should find all those Wine applications that show up in the "Open with" menu - delete (forever - don't just uncheck them) those that you don't want to show up on the "Open with" menu anymore.


Thanks to Bhaismachine for the tip and screenshots!

Kamis, 23 Desember 2010

Google Reader Indicator For Ubuntu

Google Reader Indicator Ubuntu

Lorenzo @ atareao.es has created yet another Ubuntu indicator: Google Reader Indicator, which you can use to take a quick look at your unread Google Reader items.

There is another indicator for displaying your Google Reader number of unread items - Cloudsn, but Google Reader Indicator does more than that: it displays the headlines with direct links to those articles (so clicking a headline in the Google Reader Indicator will open that article in your default browser); further more, Google Reader Indicator also displays NotifyOSD notification bubbles with the title and an excerpt of the articles as well as the number of unread items.

The time between the unread items checks as well as the time of the notifications can be configured from its settings.

In my test, the notifications were displayed for a very short period of time (even though I've set the maximum amount of time in the settings) - but that might have something to do with the very large number of subscriptions I have in Google Reader. Since I couldn't take any screenshots of the notifications, here are 2 from Atareao:

Google Reader Indicator notifications - unread items

notifications - google reader indicator


Install Google Reader Indicator

Add the Atareao PPA (warning: the repository has changed so if you added the Atareao PPA before, you can remove it and add this one instead) and install Google Reader Indicator (available for Ubuntu Lucid, Maverick and Natty):

sudo add-apt-repository ppa:atareao/atareao
sudo apt-get update
sudo apt-get install google-reader-indicator

Launch it from Applications > Accessories.


See also: "My Weather Indicator", another Ubuntu indicator created by Atareao.


Thanks to Atareao for yet another great Ubuntu Indicator and last 2 screenshots in the post.

Unified Me Menu And Messaging Menu Mockups; Ubuntu May Get A "Silent" Mode

There is a discussion going on @ Ayatana mailing list regarding the merge of Me Menu (the applet that displays your name, used to set your status) and Messaging Menu (Chat, Email, etc.) and mockups have already started to be posted:


1. Unified Me Menu and Messaging Menu indicator by mockups by Saleel Velankar:

Unified Me Menu Messaging Menu mockups


me menu messaging menu mockups


2. Unified Me Menu and Messaging Menu indicator by mockup by Frederik Nnaji:

unified me menu messaging menu mockup


In both mockups, besides the unified Me Menu and Messaging Menu you can also notice a "Do not disturb" mode which has also generated a lot of discussion on the Ayatana mailing list: the plan is to include this mode sometime around Ubuntu 11.10 and it won't only set your IM status, but set your whole computer in a "Do not disturb" (aka "silent") mode:


When busy, occupied or in a "Do Not Disturb" state of mind or activity, we need a way of silencing incoming calls and other in that moment trivial notifications: Silent Mode.

Silent Mode
* mute notification sounds
* mute NotifyOSD bubbles
* mute ringtone for incoming calls
* don't popup update-manager automatically

What is the current implementation of this on the desktop?
Mute all notification sounds:
* "mute all" via Sound Menu
Mute NotifyOSD bubbles:
* uninstall NotifyOSD manually
* disable bubble notifications in Empathy
* disable Empathy
* use a different DE
Mute ringtones:
* go offline
* disable Empathy/Skype
* "mute all" via Sound Menu

Mark Shuttleworth:

[Has anyone started speccing this out already?]

I don't believe so. If you would like to do a spec, either work with MPT or I'll review it with you until it gets approval and then it can be queued for 11.10. This is LOOOONG overdue, and I appreciate your offer of help.


What do you think about the mockups? How about the "silent" mode?

Rabu, 22 Desember 2010

Nautilus 3.0 Mockups: More Polish, Overlay Statusbar

A couple of new Nautilus 3.0 mockups were posted by Allan Day on his blog. Althouth they look a lot like some older mockups, they are more polished and make better use of space:

Nautilus 3.0 mockups


Here's an older mockup (that dates back to July, 2010):

Nautilus old mockups


As you can see, the statusbar is missing in the new mockups (first and last images in this post), - in it's place, there's a temporary (only shows up when needed), overlay status bar. Once again, Gnome and Ubuntu go hand-in-hand, trying to implement the same thing but in a different way, because Ubuntu  might ditch the statusbar (but not just in Nautilus) too, this being the main reason why Mark Shttleworth proposed the Windicatos.


Nautilus 3.0 mockups


While removing the statusbar may sound like a good idea in most applications, it doesn't feel right to do it for Nautilus because in such an application it holds very useful information like the size of the selected file(s) and so on. But of course, these are just mockups which don't show the exact functionality of the new overlay statusbar.


What do you think?


via afaik

Window Applets 0.2.10, Released

Gnome Window Applets

Window Applets is a package that comes with two Gnome panel applets: Window Title and Window Buttons which are basically controls for windows that are placed on the Panel instead of the window. They provide a clever way to increase vertical screen space.


New features / changes in Window Applets 0.2.10:
  • Disabled applet hiding by default (it was causing confusion with new users)
  • Added option to override button orientation (automatic/default, horizontal and vertical)
  • Added option to reverse button order
  • Updated themes: Ambiance-Maverick, Radiance-Maverick (thank you Cierreics)
  • Saturate title icon and darken text on inactive
  • Select a more apropriate non-custom title text color
  • Added options to set both active and inactive font/color
  • Added experimental option to show window action menu on title right click. Warning: Overrides applet menu over title.


To install Window Applets 0.2.10 in Ubuntu, you can use the WebUpd8 PPA:
sudo add-apt-repository ppa:nilarimogard/webupd8
sudo apt-get update
sudo apt-get install gnome-window-applets

Then, right click the Gnome Panel, select "Add to panel" and add "Window Title" and "Window Buttons".

Humble Indie Bundle #2 Adds More Games

Humble Indie Bundle is a pay-what-you-want (any price whatsoever), DRM-free bundle of indie games.

Because of the huge success it had (it's close to $1.3M USD at the time I'm writing this post), all those who have purchased Humble Indie Bundle #2 will also get the 5 amazing games that were included in Humble Indie Bundle #1. However, if you haven't purchased Humble Indie Bundle #2, you'll have to pay at least $7.41 to get both bundles.

If you're interested in puchasing Humble Indie Bundle #2, head over to humblebundle.com. There are only 3 days left!

Install VirtualBox 4.0.x (Stable) In Ubuntu, Via Repository

VirtualBox 4.0

VirtualBox 4.0 has been released today. We've already covered what's new in VirtualBox 4.0.x when the first beta came out so check out that post or the changelog for more info.

As you probably know, starting with VirtualBox 4.0.x some features are now available separately, in an extension pack. Here are the step-by-step instructions on installing both VirtualBox and the Extensions Pack in Ubuntu.

Install VirtualBox 4.0 in Ubuntu


1. Remove any previous VirtualBox version you had installed.

Presuming you were using version 3.2, you would have to run the following command:
sudo apt-get remove virtualbox-3.2

2. Add the VirtualBox contrib repository and install VirtualBox 4.0.x (currently 4.0.4):

VirtualBox 4.0.x (currently 4.0.4) is no longer available in the non-free component of the VirtualBox Ubuntu repository but in contrib.

Add it and install VirtualBox using the following commands:

sudo -v
echo "deb http://download.virtualbox.org/virtualbox/debian $(lsb_release -sc) contrib" | sudo tee -a /etc/apt/sources.list
wget -q http://download.virtualbox.org/virtualbox/debian/oracle_vbox.asc -O- | sudo apt-key add -
sudo apt-get update
sudo apt-get install virtualbox-4.0

3. Download the Extension Pack.

For USB 2.0 devices, VirtualBox RDP and PXE boot for Intel cards support, you'll also have to install an Extension pack which you can download from HERE.


4. Install the VirtualBox Extension pack.

Virtualbox 4.0 extensions pack

Open VirtualBox 4.0.x and go to File > Preferences and on the Extensions tab, click the "add" button on the right (first blue diamond) and browse for the VirtualBox extension pack you've downloaded in step 1. That's it!


Thanks to gericom for the Contrib repository tip!

Selasa, 21 Desember 2010

The Ubuntu Font Now Available For Any Website Through Google Font Directory

Ubuntu font

Google announced that the Ubuntu Font Family is now available in the Google Font Directory which makes it very easy to install for any website:

Through the magic of the Google Font API any web designer can now pick Ubuntu from the Google Font Directory and bring the beauty and legibility of the Ubuntu fonts to their websites too.

To use it on your website, head over to Google Font Directory, select the Ubuntu font variant you want to use and copy the code to the "head" section of your blog (above "</head>"). The code looks like this:

<link href='http://fonts.googleapis.com/css?family=Ubuntu' rel='stylesheet' type='text/css'/>


You can use the font for all the font on the website or only for some parts of it like the posts tile (like we are using it here, on WebUpd8). To only use it for the post titles, search for "h1" in your CSS code and add this:

font-family: 'Ubuntu', arial, serif; 

Easily Upload Images To Facebook Using Nautilus Facebook Uploader

nautilus facebook uploader

Nautilus Facebook Uploader is an application to upload pictures (it supports multiple pictures at once) to Facebook via Nautilus. Using this application, you'll be able to post photos to your wall, upload photos to an existing album or create a new album. Support for setting a profile picture should be coming soon.


Installation

Download and extract Nautilus Facebook Uploader, then double click the "install.sh" file and select "Run in terminal". The installation script will now move the files to the right folders and install the required dependencies.

Usage

Once Nautilus Facebook Uploader has been successfully installed, right click an image (or multiple images) and select Scripts > Upload to Facebook. The first time you use the script, you'll have to authorize it - so click the Authorize button. A new tab should open in your default browser redirecting to Facebook (where you must log in if you're not logged in already) and then click the "Allow" button. Then copy/paste the URL from the browser address bar into the Nautilus Facebook Uploader dialog.

Now you can click the "Generate/Refresh List" button. The first time you do this, you'll have to enter your username (NOT EMAIL ADDRESS). If you don't know your facebook username, CLICK HERE (see the url under "Your username has been set").

And finally, select where to upload the images (an album or your Wall) and click "Upload" - the images you've previously right clicked will now be uploaded to Facebook.


Note: the application works ok for me using Chrome, however the Nautilus Facebook Uploader page mentiones there might be issues when authorizing the application using Firefox. To overcome this, you could set a different browser as default when authentificating Nautilus Facebook Uploader or follow the instructions @ Nautilus Facebook Uploaded Gnome Look page.

PhotoFilmStrip 1.4.0 (Stable) Released With A New User Interface, Customizable Aspect Ratio, More

PhotoFilmStrip

PhotoFilmStrip is an application for Windows and Linux that you can use to create a movie (slideshow) from images. It uses the "Ken Burns" effect for the pictures transitions and you can also add music and captions to your images. You can further customize the video by setting the duration time for each image, the transition and transition time and additionally, the effect (sepia or black and white). The video can be rendered in VCD, SVCD, DVD or FULL-HD (1920x1080).


PhotoFilmStrip 1.4.0 was released yesterday, bringing (some of these features were already available in the unstable version like you can read in our PhotoFilmStrip review) a new user interface, customizable aspect ratio (16:9, 4:3 und 3:2), copy and paste for motion positions, Flash-Video renderer, a new transition (roll), better audio support, keyboard shortcuts and more.


Download PhotoFilmStrip 1.4.0 (includes .deb file).


Thanks to LFFL for the news!

Senin, 20 Desember 2010

Add Tabs To Skype For Linux Using SkypeTab

Skype tabs linux

SkypeTab is a tool that wraps Skype chat windows into a tabbed interface. Besides integrating the conversations, SkypeTab can also embed the Contact List into its wrapper.

Overall, SkypeTab is a really nice tool - if you don't move the window, because the Skype conversation windows lag a lot behind the tabs wrapper when moving the window and unfortunately the author says this cannot be fixed, at least not at this time. Nevertheless SkypeTab is a nice tool if you usually have a lot of Skype conversation windows opened and want to unclutter you desktop.

To use it, firstly run "SkypeTab" (from the Applications > Internet) and then run Skype.


Important: Skype Tabs only works with Compiz, Openbox and Xfwm.


Download Skype Tabs (includes Ubuntu / Debian .deb files) | For feedback, see the SkypeTab Ubuntuforums post.

Warsow 0.6 Released With 6 New Maps, "Capture The Flag" Gametype

Warsow 0.6

Yet another game got a new version just in time for the holidays: Warsow - a futuristic cartoon-like first-person shooter - 0.6 was released yesterday featuring 6 new maps and a new gametype: the well known "Capture the Flag".

Warsow 0.6 also comes with a new soundtrack, re-textured maps and weapons for improved visuals, higher framerates thanks to greatly improved engine performance and many other new features and improvements - see the complete changelog.


Download Warsow (free) - available for Windows, Linux and Mac OSX. To run it on Linux, download the Unified ZIP, extract it and double click the "warsow" file.

Alien Arena 2011 Now Available At PlayDeb [Easily Install It In Ubuntu]

Alien Arena 2011

This is just a quick update to let you know that Alien Arena 2011 (7.50) which was released last week is available for Ubuntu 10.04 and 10.10 users @ PlayDeb.

To install Alien Arena 2011, you'll have to download and install THIS .deb - it will automatically add the PlayDeb repository to your software sources. Then simply visit the Alien Arena page at PlayDeb and click the install button.

Minggu, 19 Desember 2010

DockBarX Theme Pack For Avant Window Navigator / Faenza Users

DockBarX big dock

"DBX big dock" pack is a DockBarX theme package especially created for those that use DockBarX with Avant Window Navigator and comes with updated "Unite" themes (Unite_v and Unite_h) with new blink attenton effects as well as versions for these themes without backgrounds and bigger icons for Faenza icon theme users (the themes are called Faenza_Unite_v and Faenza_Unite_h). The pack also includes a mod of the DockBarX "dock" theme with nice colors and attention effects.

All the themes in the "DBX big dock" come with 2 versions: for horizontal and vertical dock.

DockBarX faenza
(DockBarX Faenza_Unite_H)


Installation

Download the "DBX big dock" pack from Gnome Look and extract it on your desktop, then run the following commands:
cd ~/Desktop/136409-Dock-pack/themes
sudo cp * /usr/share/dockbarx/themes/

Then, open the DockBarX preferences (Applications > Accessories) and try out the new themes!


See also: DockBarX 0.41 installation instructions (including extra themes and AWN applet)

XBMC 10.0 "Dharma" Released With Built-In Addons System, VAAPI Support, Improved VDPAU, More

XBMC 10.0

XBMC is a free and open source (GPL) software media player and entertainment hub for digital media for for Linux, OSX, Windows, and the original Xbox.

XBMC 10.0 "Dharma" has been released yesterday. Most of the work in the new version has been done to the addons framework. Until XBMC 10, you had to search for new skins and addons through the forums, manually download and install it and so on - starting with version 10, installing new skins and addons got a lot easier: in XBMC 10, installing a new skin or addon is done from the XBMC interface (the Addons section).

I must say I'm loving the Grooveshark addon! There was an issue with it not playing for some reason but after chaging the playback core to "DVDPlayer" under the Grooveshark plugin settings it finally worked.

XBMC 10 - grooveshark

XBMC 10 Dharma


XBMC 10.0 also comes with improved XBMC's GUI Engine / Skinning Framework, initial gesture support, Broadcom Crystal HD decoders support, native support for unencrypted Blu-ray Disc playback without menus, Blu-ray Disc detection for external players, WebM support and much more.

Linux specific features in the latest XBMC 10.0 include initial support OpenGL ES 2.0, VAAPI (Video Acceleration API) support (requires VAAPI compatible hardware and drivers), OpenMAX Video Acceleration support (requires OpenMax IL compatible hardware, like Tegra2), NEON (ARM) Video Acceleration support (requires NEON compatible hardware, like OMAP3) as well as improved VDPAU Hardware Video Acceleration support and its upscaling/deinterlacing capabilities.

Read the complete XBMC 10.0 changelog.


Install XBMC 10.0 "Dharma" in Ubuntu

XBMC 10.0 is already available in a PPA for Ubuntu users. Add the PPA and install the latest XBMC using the following commands:
sudo add-apt-repository ppa:team-xbmc/ppa
sudo apt-get update
sudo apt-get install xbmc

There is also a bootable XBMC Live ISO available for download which you can use to create a bootable USB with Ubuntu Startup Disk Creator or Unetbootin or just burn it onto a CD and directly boot into XBMC.

Download XBMC 10.0 for Windows, Mac OSX, Linux


Thanks to bhaismachine for the tip!

Select-o-Magic 3000 Automatically Creates Playlists From Your Music Library Based On The Criteria You Select

Select-o-magic 3000

Select-o-Magic 3000 is a simple application that allows you to create a playlist from your music library based on the tags you select, such as genre, artist, year, album, mood or BPM. It supports mp3s, ogg and flac audio files.

The application is very easy to use: simply select "Scan Audio Files", select the folder where you keep your music and then you'll be able to select the criteria for the music that will be added to your playlist. You can configure the audio file type to be scanned, media player as well as the criteria to be used - you can find these under "Configure".

When you're ready, click "Make Playlist" - this will allow you to either save the playlist or directly send the playlist to your preferred music player (which you've previously configured in the Select-o-Magic 300 settings).

Note: your music needs to be tagged correctly for Select-o-Magic 3000 to work properly.


Download Select-o-Magic 3000 (to use it, extract the downloaded archive and double click the "som3000" file).


Thanks to LightningRose for the tip!

Sabtu, 18 Desember 2010

CADuntu (2D CAD Drawing Tool) Becomes LibreCAD, Gets Ubuntu PPA

LibreCAD

CADuntu is a 2D CAD drawing tool based on the community edition of QCad ported to Qt4 and works natively on OSX, Windows and Linux.

Starting today, CADuntu has a new name: LibreCAD and it can easily be installed in Ubuntu, getting a PPA for Lucid, Maverick and Natty. Even though LibreCAD is quite new (and still in beta), it is already available in several languages and gives a real GPL solution to read/modify/create CAD files.


Install LibreCAD in Ubuntu:

For Ubuntu 10.04:
sudo add-apt-repository ppa:showard314/librecad
sudo apt-get update
sudo apt-get install librecad
For Ubuntu 10.10 and 11.04:
sudo add-apt-repository ppa:showard314/ppa
sudo apt-get update
sudo apt-get install librecad

The application will show up as "CADuntu" in the menu but that should change soon.


Download LibreCAD for Mac OSX and Windows.


See also: Bricscad: .dwg Based CAD Software Is Now Available For Linux

How To Compile The Kernel In Ubuntu, The Easy Way [Video]

So you want to compile and maybe even apply a patch to the kernel but you've always thought that's too difficult? Well, it isn't, thanks to KernelCheck, a program that automatically compiles and installs the latest Kernel for Debian based Linux distributions (Debian, Ubuntu, Mint, etc.).

To make it even easier, I've recorded a screencast on how to use KernelCheck to compile the kernel and how to apply a patch:


You can also watch it @ YouTube.


Jumat, 17 Desember 2010

CPU Frequency Scaling AppIndicator

Indicator CPUfreq

Yet another very useful Gnome applet got an appindicator: CPU frequency scaling applet. By using an appindicator, this tiny application will be able to run in Ubuntu 11.04 without using a Gnome panel (the Unity panel doesn't support the regular Gnome applets).

For now it still depends on gnome-applets, but this might change in the future.


It's nice to see that most applets are getting an appindicator and will thus work on future Ubuntu versions, but it's a shame for all the good applets that will be lost in this transition. And it's not just Ubuntu - Gnome Shell won't support all these applets either.


Install Indicator Cpufreq in Ubuntu

Add the PPA and install Indicator-Cpufreq in Ubuntu Maverick or Natty by using the following commands:
sudo add-apt-repository ppa:artfwo/ppa
sudo apt-get update
sudo apt-get install indicator-cpufreq

Then to run it, press ALT + F2 and enter: "indicator-cpufreq" (without the quotes).


Indicator Cpufreq is very new so you may find bugs - report them @ Launchpad!


[via Corridor Nine; thanks to Артём for uploading Maverick packages too!]

Dropbox 1.0 Stable Released With Selective Sync, Huge Performance Enhancements, More [How To Upgrade To 1.0 In Ubuntu]

Dropbox 1.0 Ubuntu

Dropbox 1.0 (actually 1.0.10) has finally been released! The new stable version finally brings selective sync, Ubuntu appindicator, huge performance enhancements and hundreds of bugs fixed. These features were already present in the Dropbox experimental builds for quite some time but only now they've "graduated" into the stable Dropbox 1.0 version.

Performance enhancements - The client-side sync engine has been re-architected to optimize the response time and resource consumption. Dropbox 1.0 reduces the memory usage by 50%.


Selective Sync - you can now choose which folders to sync:

If you have a netbook or a computer with a tiny hard drive, syncing your entire Dropbox isn’t always a great idea. You also might not want certain files on your home computer to pop up on your work computer. Selective Sync solves these problems! You now can choose which folders get downloaded to which computers. This saves you time so you don’t have to sync stuff you don’t need.


Dropbox appindicator

Ubuntu AppIndicator - the Ubuntu version of Dropbox now comes with an AppIndicator which makes it consistent with the whole Ubuntu look. Further more, Dropbox now supports custom AppIndicator icons.


Upgrade to Dropbox 1.0 stable in Linux


To upgrade to the latest stable Dropbox in Ubuntu (and other Linux distributions), firstly close Dropbox, then run the following command:
mv ~/.dropbox-dist ~/.dropbox-dist.OLD
The above command will move the old Dropbox installation folder to ~/.dropbox-dist.OLD as a backup.

Then, simply run Dropbox from Applications > Internet > Dropbox - doing so, the latest stable Dropbox version will be automatically downloaded and installed (and your old settings won't be removed):

Dropbox


Thanks to Nicolas for the tip!

Download Kernel 2.6.36 .deb Compiled With The" 200 Lines Patch" For Ubuntu 10.10 Maverick Meerkat (32bit)

WebUpd8 reader Mahdi has created Ubuntu 10.10 Maverick Meerkat 32bit .deb packages for Linux Kernel 2.6.36 compiled with the 200 lines patch which he says it works great so he wanted to share it with our readers (download links below). The patched Kernel will be available as an optional install in his Ubuntu remaster called AriOS (previously known as mFatOS) which is due to be released this week.


Download patched 2.6.36 Kernel for Ubuntu 10.10 Maverick Meerkat 32bit (both packages are required):
Warning: use it at your own risk!

To check if the "Automatic process group scheduling" (200-line patch) feature has been enabled on your system open a terminal and type:
cat /proc/sys/kernel/sched_autogroup_enabled

The output of this command must be "1".


For 64bit, you can find download links in our initial Alternative To The "200 Lines Kernel Patch That Does Wonders" Which You Can Use Right Away post (look at the end of the post).


If you have applied the 200 lines Kernel patch alternative, you may want to remove it before installing the above debs:

1. Remove the changes made to the ~/.bashrc file - open a terminal and type:
gedit ~/.bashrc

Then scroll down and remove this code (or similar code if you've used some older instructions):

if [ "$PS1" ] ; then  
mkdir -p -m 0700 /dev/cgroup/cpu/user/$$ > /dev/null 2>&1
echo $$ > /dev/cgroup/cpu/user/$$/tasks
echo "1" > /dev/cgroup/cpu/user/$$/notify_on_release
fi

2. Remove the cgroup_clean file:
sudo rm /usr/local/sbin/cgroup_clean

3. Remove the changes made to the rc.local file:
sudo gedit /etc/rc.local

And remove the following lines (or similar code if you've used some older instructions):

mkdir -p /dev/cgroup/cpu
mount -t cgroup cgroup /dev/cgroup/cpu -o cpu
mkdir -m 0777 /dev/cgroup/cpu/user
echo "/usr/local/sbin/cgroup_clean" > /dev/cgroup/cpu/release_agent

Do not remove the "exit 0" line.


Then install the patched kernel .deb files and reboot.


Thanks to Mahdi for the patched Kernel!

id3fs Creates A Filesystem Of Your Music Which You Can Browse By ID3 Tags

If you have a lot of music that's proprely tagged but the directory structure is a mess, you can still browse it in a really smart way by using id3fs.

id3fs works with mp3, flac and ogg files and provides a browsable filesystem of your music files, organised into sub-directories by id3 tags (or flac/ogg comments).

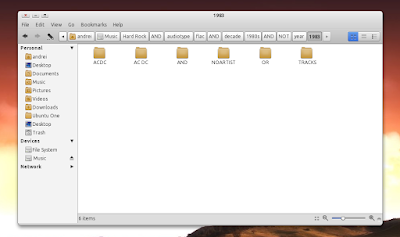
Basically, this little command line tool will create symbolic links to your actual music which you can then browse by artist, audio type (mp3, flac, ogg), genre, year, decade, ratings and more. But not only that - you can also combine these as it supports operators such as "AND" and "OR". Example: Metal/AND/year/2005/OR/4-star.

Here is a screenshot to get a better idea on what id3fs actually does (although you must really try it to get the whole picture):

id3fs


More folder structure examples:

goth/AND/decade/1980s/
postrock/AND/NOT/rating/terrible/
thrash/OR/rapmetal/AND/NOT/wears-a-red-hat/
prog/AND/decade/1970s/OR/psychedelia/AND/decade/1960s/
location/sweden/AND/screamo/AND/postrock


How to use id3fs

Using id3fs is very easy (firstly make sure you've installed id3fs - download link at the end of the post):

1. Create a folder somewhere on in your home directory - let's call it "tags".

2. id3fs will have to index all your music. To do this, run the following command:
id3fs-index /path/to/your/music

Where /path/to/your/music is... you got the idea.

3. Now you'll have to mount a view of your music in the folder created in step 1 (called "tags" in my example):

sudo id3fsd /path/to/your/music ~/tags


That's it. Now go to the ~/tags folder and you'll be able to browse your music based on the various criteria mentioned above.


Download id3fs .deb | More info and source files download

Kamis, 16 Desember 2010

Alien Arena 2011 (7.50) Released In Time For The Holidays [Ubuntu Installation Instructions]

Alien Arena 2011

Alien Arena is a free, stand-alone first-person shooter computer game based on source code released by id Software. Begun by COR Entertainment in 2004, the game combines a 1950s-era sci-fi atmosphere with gameplay similar to the Quake, Doom, and Unreal Tournament series (via Wikipedia).


Alien Arena 2011 (7.50) has been released today, just in time for those who have some free time during the holidays.

The new version includes new ragdoll physics using the Open Dynamics physics engine ("ragdoll physics are a type of procedural animation that is often used as a replacement for traditional static death animations"), revamped in-game IRC client, two new maps (Annihilation and Neptune), one revamped map, new music, true type font support, tweaks and much more. A complete changelog can be found here.


Official Alien Arena 2011 trailer:


The Alien Arena 2011 package no longer comes precompiled so to run it in Linux, you'll have to compile it. In Ubuntu, run the following command:
sudo apt-get build-dep alien-arena

Just to make sure you've installed all the required packages (some might not be installed by "build-dep"):
sudo apt-get install build-essential libode-dev libx11-dev libgl1-mesa-dev libxxf86vm-dev libxxf86dga-dev libopenal-dev libjpeg8-dev libvorbis-dev libcurl4-gnutls-dev libfreetype6-dev

Compile and install it with:
./configure --prefix=/usr
make
sudo make install

Then press ALT + F2 and enter: "crx" (without the quotes) to run it.


Note that the above instructions are only a rough guide for those who know how to compile packages! If compiling is not your thing, wait for Alien Arena 2011 to be added to PlayDeb.net.


Download Alien Arena 2011 (7.50) (for Windows and Linux)